Menu


This was a quick little creation that sounded really good. I used to love jello powder in cottage cheese mixed with fruit, but that has far too many carbs than I care to even think about.
These little things are great in a pinch and a fat bomb to boot! I've made them a couple times now and they are almost addicting!
Whats great is you can make these in any flavor you choose! Don't want to use pre-packaged jello? use gelatin or Xanthan gum and different flavors! The sky is the limit! Let your imagination run wild!
We would love to hear what you tried with yours!

Coconut Rolled Jello Fat Bombs

Servings20 Fat Bombs
Ingredients
  • oz Cream Cheese Softened
  • 8.5 g Sugar Free Jello- Any Flavor
  • cup Unsweetened Coconut Flakes
  • 1 packet Stevia
Directions:
  1. Soften the Cream Cheese
  2. Add the SF Jello and Stevia packet and mix well
  3. Chill in the refrigerator for approximate 10-15 min. This will allow the mixture to be more easily formed into balls.
  4. Roll mixture into 1" balls and then roll through coconut flakes to coat.
  5. Store in the fridge and enjoy!
Alternate options: Roll in ground almonds or almond flour. This option is one of my favorites.
Makes: 20 Fat Bombs
Nutrition Facts per Jello Ball:  (Coconut Jello Fat Bombs)
  • Calories: 50
  • Fat 4.5g
  • Carbohydrate 0.7g
    • Dietary Fiber 0.2g
    • Sugars, other 0.6g
      • Net Carbs: 0.5g
  • Protein 0.9g

Almond Coated Jello Bombs


Ingredients
  • oz Cream Cheese Softened
  • 8.5 g Sugar Free Jello- Any Flavor
  • 1/2 cup Unsweetened Coconut Flakes
  • 1 packet Stevia
  • 1/2 cup Almond Flour (Not likely to use all of it)
Directions:
  1. Soften the Cream Cheese
  2. Add the SF Jello and Stevia packet and mix well
  3. Chill in the refrigerator for approximate 10-15 min. This will allow the mixture to be more easily formed into balls.
  4. Mix in coconut flakes,
  5. Roll mixture into 1" balls and then roll through coconut flakes to coat.
  6. Store in the fridge and enjoy!

Serving Size: 1 Serving (21g)
Recipe Makes: 20 Servings
Nutrition Per Serving: (Almond Coated Jello Bombs)
  • Calories: 56
  • Total Fat 4.9g
  • Total Carbohydrate 1g 
    • Dietary Fiber 0.5g
    • Sugars, other 0.5g
      • Net Carbs: 0.5 g
  • Protein 1.5g
0

Great Pizza Snacks to help curb those pizza cravings or just finger food or H'orderves for a get together.  These ended up being fairly easy to make and were quite tasty.
These even lend themselves to being more creative by adding in some peppers, black olives, onions, maybe even some spinach and other items! The sky is the limit! What would you like on your pizza bites?
For these ones I put a few pieces of mushrooms and yellow pepper.

Servings: 12 Snack bites
Ingredients:
  • 60 g shredded cheese
  • 1 Egg
  • 66 Slices Pepperoni
  • 1/2 tsp Oregano
  • 1/2 tsp Basil
  • 2 Tbs Pizza Sauce
Directions:
  1. Warm the pepperoni up slightly as it makes it easier to fit into the smaller muffin tins.
  2. Place 3 pepperoni slices in each section of the muffin tray.
  3. Mix the cheese, egg, basil and oregano.
  4. Divide the cheese mixture equally in the muffin cups
  5. If you are adding in vegetables, add these on top.
  6. Bake for 5-7 minutes at 450 degrees F.
  7. Let sit for 3-5 minutes before pulling the pepperoni cups from the tin.
  8. Place a dollop of pizza sauce on each cup and enjoy!

Nutrition Facts
Serving size: 1/12 of a recipe (0.8 ounces).
Amount Per Serving
  • Calories 76.51
  • Total Fat 6.78g
  • Sodium 242.48mg
  • Total Carbohydrates 0.89g
    • Fiber 0.05g
    • Sugar 0.02g
    • Sugar Alcohols 0g
    • Net Carbohydrates 0.84g
  • Protein 1.72g
0

These turned out fantastic and were demolished rather quickly. A Great low carb snack or even great as a lunch!  I hope you enjoy these as much as we did!
Servings
Servings: 12
Yield: 12 Pinwheels
Cooking Times
Preparation Time: 10 minutes
Inactive Time: 30 minutes
Total Time: 40 minutes
Ingredient
  • 2 slices Turkey Lunchmeat
  • 5 Tbs Cream Cheese
  • 4 Strips of bacon
  • 1 small Avocado
  • 1 tsp Ranch Seasoning Mix (Home Made or Store Bought)
  • 1/2 can of Black Olives
Directions:
  1. Cook and crumble bacon (optional to leave in strips)
  2. Slice Black Olives
  3. Dice Avocado
  4. Mix cream cheese with ranch mix.
  5. Spread Cream Cheese Mixture on to the turkey
  6. Layer in the avocado, bacon and black olives.
  7. Roll up using cling wrap and refridgerate for 30 min
  8. Cut and serve.

Nutrition Facts
  • Serving size: 1/12 of a recipe (1.7 ounces).
Amount Per Serving
  • Calories 187.57
  • Total Fat 19.5g
  • Total Carbohydrates 2.08g
  • Fiber 1.37g
  • Sugar 0.3g
  • Sugar Alcohols 0g
  • Net Carbohydrates 0.71g
  • Protein 1.36g
0


 I honestly don't know how I survived before acquiring a stand mixer! There are several other brands out there, but nothing compares to a KitchenAid. There are a wide range of attachments that you can add to your mixer which makes it a platform you can build to meet your needs. I personally don't enjoy clutter on my kitchen counters so most everything has a home in a cabinet somewhere, but my KitchenAid has its own esteemed place on display.


We purchased our Artisan series 5 Quart Tilt-head mixer in Imperial Grey used but in great shape. I don't the the previous owners ever really used it. The finish on it is textured and feels very durable. We decided on this finish due to its easy cleanup and the matte finish does not show fingerprints. It comes with a 5 Quart mixing bowl with handle and three mixing attachments. The included attachments will handle most of the mixing jobs that you can throw at them. There is a  for whipping and mixing, a dough hook for kneading, and a beater for....beating?

The mixer itself is very heavy and weighs in at nearly 25 lbs. The head tilts up so that you can lock in the mixing bowl or change attachments. Care should be used when moving the mixer. Make sure that if you grab it by the head to move it, that the head is locked in place. If not, the base will drop down you can spill things out of the bowl. One locked in, you turn the mixer on by moving the sliding switch on the left side towards the front of the mixer. This is a 10 speed mixer and the switch has little clicks along the way to help you know what speed you are in. The mixing attachment will spin and also orbit around the bowl.

The power of a KitchenAid mixer is hard to compare if you have only used a hand mixer before. Heavy or dry ingredients just don't slow it down. It just powers through mixing things, even heavy things like cookie doughs.

Kitchen-Aid Attachments

As I mentioned above, Kitchen-Aid mixers are designed so you can add attachment to increase the usefulness and versatility. Kitchen-Aid stand mixers are compatible with attachments made all the way back to the current versions design in 1937. This means there are 80 years worth of attachments out there just waiting to be discovered and put to work in your kitchen. I don't use a lot of attachments for my Kitchen-Aid yet, but there are two items that I do use a lot.

Kitchen-Aid Flex-Edge Beater


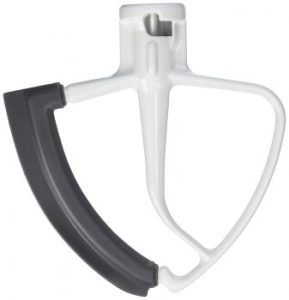
The first is a Flex-Edge Beater which helps scrape the sides of the bowl while mixing. This Beater has a rubber wiper on one side that helps incorporate things stuck to the side of the bowl back into the mix. And it keeps me from having to take a rubber spatula to the bowl while mixing. I can walk away and do other stuff. I believe Kitchen-Aid sells a flex-edge with two rubber wipers also, but I have not ordered one of those yet.

Kitchen-Aid Pasta Roller & Cutters


A pasta roller? On a Keto diet? We received a pasta set as a gift. We used them a few times to make fresh fehttuchini and soup noodles back before starting our Keto adventure. Since going Keto, we stashed our pasta kit in the back of the cupboard and forgot about it.

Our pasta kit has two main parts, a fehttuchini cutter and a dough roller. The dough roller has five thickness settings which gives you control over how thick your doughs are. Like I said, we had stashed our kit in the back of the cupboard thinking we wouldn't really ever use them again. But then Mrs. Recipe Junkie found some recipes for crackers and tortilla chips. We were struggling to roll out the crackers to a consistent thickness.

Pasta attachments are meant to be kept dry. As such you can wipe down with a slightly damp cloth after use, but you should never wash them. And if you are following the directions with them, you should never really need to.

Our Attachment Wish List

There are a huge variety of attachments that we want to add to our collection. There is an ice-cream maker that we want to get to make Keto friendly deserts. I would also enjoy a meat grinder to make sausages and jerkies without having to pull out my big grinding setup.

Another essential attachment for a Keto kitchen is a Spiralizer so you can make Zoodles!
If you don't already have a stand mixer of some type, a KitchenAid should be your top priority. It will change the way you cook!
0

This is quite the treat, tastes like your normal bars with an 'Almond Joy' twist. This little bit makes a surprising amount and will surely be a hit with guests!
Another great perk - this is SUPER simple to make! Very few dishes and tastes like it would take much more effort!
Servings: 8
Cooking Times
  • Preparation Time: 5 minutes
  • Inactive Time: 20 minutes
  • Total Time: 25 minutes
Ingredients
  • 1 cup Lilys Stevia-Sweetened Chocolate Chips
  • 1 Tbs Coconut Oil
  • 1 cup Sliced Almonds
  • 1/4 cup Unsweetened Coconut Flakes
  • Coarse Pink Salt or Sea Salt for Sprinkling
Directions:
  1. In a microwaveable container, melt chocolate chips with coconut oil. Start with 1 minute, stir, then stir every 30 seconds until smooth.
  2. Add sliced almonds and stir well.
  3. Spread mixture onto a parchment or wax paper
  4. Sprinkle with coarse salt and unsweetened shredded coconut
  5. Freeze for 20 minutes.
  6. Break into bite size pieces.
  7. Store in fridge or freezer.

Nutrition Facts
Serving size: 1/8 of a recipe (0.5 ounces).
Amount Per Serving
  • Calories 74.55
  • Total Fat 6.81g
  • Sodium 59.08mg
  • Total Carbohydrates 3.73g
    • Fiber 1.53g
    • Sugar 0.32g
    • Sugar Alcohols 0.76g
    • Net Carbohydrates 1.44g
  • Protein 1.81g
Recipe Type: Dessert
0

These babies may not look all that appetizing (apart from the bacon!) but they are fantastic. I could
eat 20 of them in a sitting if I was my pre-keto self. They are the "pringles" of snacks! Once you pop - you can't stop!
You might know these by another name but I've always heard them called 'Grasshoppers'.  Bacon wrapped, cream cheese filled jalapeno poppers!
They are extremely easy to make and the crunchier you get the bacon the better these taste! I missed the beer battered deep fried version of jalapeno poppers, but these quickly took over my hear!
Ingredients:
  • 5 jalapenos sliced in half lengthwise and gutted
  • 3/4 c. Cream Cheese (Philadelphia seems to have the least carbs)
  • 5 Strips of Bacon
Directions:
  1. Prepare your jalapenos (Slice, Gut, get rid of seeds and ribs)
  2. Fill with cream cheese
  3. Wrap with 1/2 strip of bacon
  4. Place on a broiler pan and bake at 375 degrees until bacon is almost done 6-10 min
  5. Turn oven to broil and broil for 2-4 minutes to crisp up the bacon
  6. Let cool and enjoy!
  7. Makes 10 Grasshoppers
Nutrition: Per Popper
  • Calories: 81.5
  • Fat: 7.4g
  • Carbs: 1.5g
  • Fiber: 0.4 g
  • Protein: 3.8 g
0

I have tried the pork rind puppy chow and it is surprisingly good. However, it does not keep very well and ends up turning the pork rinds a bit soggy/stale after a day or two.
So I figured I'd try something a bit different. I've seen others use a blend of nuts, so here is mine :)  I hope you enjoy it!


Servings
Servings: 18
Ingredients
  • 115 g Chopped Walnuts
  • 115 g Almonds
  • 115 g Pecans
  • 115 g Peanuts
  • 9 oz Lilys Stevia-Sweetened  Dark Chocolate Chips
  • 1 Tbs Butter or Coconut Oil
  • 190 g Sugar Free Peanut Butter
  • 230 g Unsweetened Shredded Coconut
  • 2 tsp Vanilla
  • 1 tsp Salt
  • 2 Tbs Erythritol
  • 2 tsp Stevia
  • 70 g Almond Flour
Directions:
  1. Melt Butter, Chocolate and Peanut butter
  2. Add Nuts, Sweetener and Shredded Coconut
  3. Mix well and spread out onto parchment lined baking sheet.
  4. Set in refrigerator for 5-10 min
  5. Sprinkle with almond flour & Salt. Break up the mixture and continue sprinkling with more almond flour as you go, to coat the puppy chow.
  6. Note: You may not need all of the almond flour. Alternate Options is peanut flour or a light powdered sweetener.
  7. Keep refrigerated.

Nutrition Facts
  • Serving size: 1/18 of a recipe (2.5 ounces).
Amount Per Serving
  • Calories 390.83
  • Total Fat 51.13g
  • Sodium 226.25mg
  • Total Carbohydrates 19.6g
    • Fiber 7.54g
    • Sugar 2.99g
    • Sugar Alcohols 4.37g
  • Net Carbohydrates 7.69g
  • Protein 10.02g
0

0

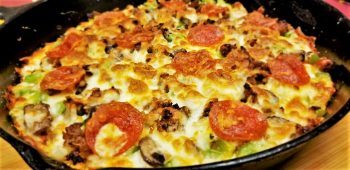
I love crunchy pizza crusts. Much like what a tombstone pizza or jacks pizza would result in. I have been working on making something that is more similar. While this doesn’t quite hit the mark, I feel it is close. It does have a crunchy outer crust to it.  Take it for a test run! Let me know what you think!
I will be continuing my ventures to find the perfect “Tombstone” style crust, but for now, this is pretty darn good!
Keep in mind that the nutrition facts are only for the crust. Be sure to add the macros for whatever you put on it ðŸ™‚  This recipe would likely make a good breakfast crust as well!!
Ingredients:
  • 3 oz cream cheese, softened
  • 80 g Mozzarella Cheese, Shredded
  • 1/4 cup butter, melted
  • 2 large eggs
  • 30 g Almond Flour
  • 68 g Whey Protein Powder
  • 1 tsp garlic powder
  • 1/4 tsp salt
  • 1 tsp onion powder
  • 1 tsp baking soda
  • 1 tsp Oregano Leaves, crushed
  • 1/2 tsp basil, chopped
Directions:
  • Place cream cheese and mozzarella in a microwave safe bowl. Heat in 30 second bursts. Stir with each increment until well blended.
  • Add in melted butter and stir
  • Add in eggs and stir
  • Add remaining ingredients and stir until well incorporated.
  • Grease a 12″ cast iron pan and place dough in pan. The dough will be fairly sticky.
  • Spread the dough out evenly and bake at 375 degrees F for 15-20 min.
  • Place toppings on your crust and return to the oven to melt the cheese.
  • Note: If you like a crispier top to the pizza toppings, place on broil for a few minutes.
Servings: 8
Amount Per Serving
  • Calories 191.1
  • Total Fat 30.05g
  • Sodium 439.95mg
  • Total Carbohydrates 2.31g
    • Fiber 0.73g
    • Sugar 0.41g
    • Sugar Alcohols 0g
    • Net Carbohydrates 1.58g
  • Protein 12.9g
0

I haven’t had Malt-O-Meal or Cream of Wheat in over 7 years since being diagnosed diabetic. I found a recipe that called for defatted almond flour and was not about to invest in even more ingredients that cost more or had fewer uses or anything else that I had to order. (I’m lazy and cheap like that.)  So I played around with the idea of that recipe and came up with this recipe.
This is already a quick favorite of mine. Its great with berries sprinkled in and a little bit of sweetener.
Servings: 2
Yield: 3/4 C. Servings
Cooking Times
Preparation Time: 5 minutes
Cooking Time: 5 -10 minutes
Total Time: 15 minutes
Ingredients
  • 45 g Almond Flour
  • 16 g Coconut Flour
  • 8 g ground Golden Flax Seed
  • 1.5 cups water
  • 1 Egg (large)
  • 2 Tbsp Heavy (Whipping) Cream
  • 1/2 Tbs Butter
  • dash of Salt
  • 1 tsp Vanilla
Directions:
  1. In a sauce pan, combine the almond flour, coconut flour, golden flax seed, water, salt and egg.
  2. Mix well and place on low heat.
  3. Continue to stir until the mixture begins to bubble.
  4. Turn off the heat and stir in vanilla.
  5. Stir in butter and Heavy whipping cream
  6. Add extras to suit taste

Nutrition Facts
Serving size: 1/2 of a recipe (8.3 ounces).
  • Calories 314.9
  • Total Fat 119.52g
  • Sodium 160.4mg
  • Total Carbohydrates 11.73g
    • Fiber 6.34g
    • Sugar 1.67g
  • Net Carbohydrates 5.39g
  • Protein 11.14g
0

Yes, This is a common recipe with a lot of controversial views. I am actually one of those people that HATE mashed cauliflower. But I watched a few videos on what everyone does to make theirs and figured I’d try it again.
It honestly did not turn out bad this time. In the past when I tried to make this, after a few bites, I couldn’t take anymore with out wanting to toss it across the room.  This time, it was great. There are a few things I did that I haven’t seen on other peoples recipes for it.
Maybe it will work for you.
Ingredients
  • 1 Head of Cauliflower
  • 1/4 c. Butter (maybe more- Excellent with Kerry Gold!)
  • Salt & Pepper to taste
  • 1 T Nutritional Yeast Flakes
  • 1/8 tsp Xanthan Gum
  • 1/2 tsp Garlic Powder
  • 1/2 tsp Chickens Soup Base( I like Orrington Farms)
  • 1.5 – 2 Tsp Parsley
Directions:
  • Chop Cauliflower into even sizes florets.
  • Steam Cauliflower for about 10 min or just under fork tender.
    • Steaming too long will make the end result very watery
  • Place Cauliflower and butter into a food processor
  • Blend until smooth
  • Add in the remaining ingredients and mix well
  • ENJOY!
0

Our trusty old food processor recently went to its grave. To be honest, we rarely used it because it didn't work well and was loud beyond the point of obnoxiousness to being downright painful. The plastic was discolored from too many trips through our dish-washer and the bearings were also shot.
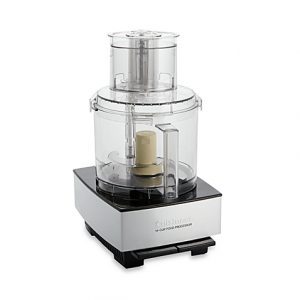
Mr. Recipe Junkie and I spent a lot of time looking at food processor reviews on other blogs and on Youtube. It became clear that if we wanted something that worked well and would last, we would need to spend some money. We came across different food processors ranging from your typical $40 models sold at the big box stores to high-end professional models. Several reviewers gave the Cuisinart Custom-14 high marks so we bit the bullet and ordered one online. Two days later our new machine arrived (Thanks Amazon Prime!).

Parts and Build Quality

This thing is a tank! The base alone weighs over 12.5 lbs. It measures out at 12.6 x 16.6 x 9.3 in. The official model number is DFP-14BCN. Our Custom-14 came with a chopping blade, a slicer, and a shredding attachment. The bowl will hold 14 cups of veggies or 3 cups of liquid. Sadly, our unit did not come with any storage options for the discs, stem, or chopping blade. Cuisinart does sell a Blade and Disc Holder which I guess is going on the Wish list.
As I mentioned, this machine is heavy. It feels like a solidly put together hunk of machinery. The base has 4 suction cup feet that grip down the counter very well and really help keep the processor in place.

There are only two buttons on this whole processor. There is an "On" button that clicks down and keeps the machine running. The other is "Off-Pulse" which will kick the On button back up. Holding down the Off-Pulse button does exactly what you would think it does. The buttons are easy to press and have a firm, mechanical feel to them. They feel solid and give great tactile feedback when you use them and have a pleasant "thunk" when you use them.
The bowl, lid, and pusher are a clear plastic that have a slight gray smoke tint to them. Again, all the parts feel very solid. None of them flex or make creaking sounds when putting parts together.
How blades and attachments actually connect on the Custom-14 is the biggest area that Cuisinart has diverged from the cheaper food processors.  Our old processor had a small bronze bearing in the bowl cover, and the blades had a little metal pin that would ride in that bearing. There was also a plastic covered drive shaft that would clip into the bottom of the bowl. When you attached the bowl to the base, that plastic part out connect the motor in the base to the bade. This was my least favorite part of the old machine. That plastic drive shaft part would get lodged into the food bowl and you had to twist with all your might to get it to pop loose. It had little plastic bits that started breaking off.
The Cuisinart is a whole different animal. There are no bearings that attach to the bowl or the blade.A drive shaft sticks up from the base through the food bowl. The blades slip onto this drive shaft. This setup is a lot simpler with less moving parts. That also means less to go wrong!
The chopper blade is the attachment that we use the most. We wanted a chopper that would do a couple things really well. We wanted a blade that would sit close to the bottom  of the food bowl. This would mean less unprocessed food at the bottom of the bowl under the blade. We also wanted the tips of the blades to be very close to the sides of the bowl, also to minimize the amount of unprocessed food was left. The Custom-14 hits it out of the park in both of these areas. The chopper blade leaves no food behind! The blades are also angled enough to really get stuff moving around in the bowl.

WARNING: There are two types of blade that came out for the Custom-14. They have issued a recall for the original blade style as there is a weak point where the blade can come apart. Please check the Cuisinart website to ensure you have the newer style blade.
Our machine came with two food processing disks in addition to the chopper blade. One disk is a 4mm slicer and the other is a medium shredder. Both these discs connect to a plastic shaft called a "Stem" that in turn connects to the shaft that comes up from the base into the food bowl. The discs themselves have little metal weights on the bottom that help balance them as they spin. Just like the chopper blade, these discs are super sharp and care should be used when handling and washing them. For the slicer discs, Cuisinart makes a variety of thicknesses including 2mm Thin, 6mm Thick, and 8mm Extra Thick. There are also other discs including a Fine Grater, Fine Shredder, and a French Fry Cutter.

When mounted to the stem, these disks ride very close to the food bowl cover. This means when you feed veggies in to chop or shred, not very much is left bouncing around unprocessed in the top of the machine.
Veggies and ingredients can be fed into the food bowl through an opening in the food bowl cover. This opening has a two-piece "Pusher"which also acts like a safety mechanism. The Pusher has a metal rod that sticks off the side which allows the machine to turn on when inserted into the food bowl cover. The food processor will not turn on unless that rod is inserted. Removing the pusher to feed veggies in will turn off the processor. This is where the two-piece design comes in. Remove the rod-shaped center of the Pusher which is twist locked in and it allows you to feed veggies in while keeping the Pusher in place. Genius!

Ease of Cleanup

Cleaning the Custom-14 is pretty straight-forward. The design team obviously put a lot of effort and thought into ease of cleaning. They minimized areas that normally catch food bits like the inside of the food bowl lid where the opening is.
The chopping blade is ridiculously sharp! Please use caution when handling these blades. Cleaning the blade the first time was a learning experience for Mr. Recipe Junkie. We quickly learned to use a bristled brush to clean the blade as a washcloth catches on the fine serrations of the blade and pulls threads out.
I recommend spraying all the parts down in the kitchen sink immediately after each use. This makes cleanup much easier when you do go through and wash up your dishes. All the parts except the base are listed as dishwasher safe. We haven't tested that though, as our dishwasher leaves spots and film all over everything and we keep this guy on the counter where everyone can see.

Pro's And Con's

Pro's

  • Excellent build quality
  • Huge food bowl
  • Clever design features
  • Satisfying button clicks
  • Easy cleanup

Con's

  • Expensive!
  • Did I mention how sharp it is?
  • Did not come with attachment storage
Overall, I would HIGHLY recommend the Cuisinart Custom-14 if you are in the market for a new food processor. This is a kitchen appliance that you will buy once and should last a very long time. While it is expensive initially, in the long run it will be cheaper as you wont have to replace it every few years like cheaper models.
0

Mr. Junkie was talking about Jagerschnitzel a while back and I’m a sucker for anything breaded and fried. This turned out pretty great! A nice crunchy breading that doesnt fall apart! We used Pork Steaks on ours, but you are welcome to use any meat you would like.
Jägerschnitzel means “hunter’s cutlets” in German, and the dish was originally made with venison or wild boar backstrap, pounded thin. It is now normally made with pork, and the Texas specialty chicken fried steak is believed to be an outgrowth of this dish brought to the USA by German immigrants.
Ingredients:
  • 70 g Almond Flour
  • 15 G Whey Protein Isolate
  • 2 tsp Rubbed Sage
  • 1/2 tsp Garlic
  • 1 tsp Salt
  • 2 Eggs
  • Choice of Pork Cut (Pork Steaks, Pork Chops, Pork Loin etc)
  • Lard for Frying
Directions:
  1. Mix the Almond Flour, Whey Protein Isolate and seasonings together. Be sure to blend until there are no chunks.
  2. Crack the eggs into a dish and whip them
  3. Dip the mean into the eggs and then coat with the almond flour mixture
  4. Heat up the lard in a frying pan to a medium heat. Use enough lard either cover the pork or cover half of it.
  5. Place the breaded pork into the lard once it has heated through.
  6. Cook until breading is crisp. If there are concerns with cooking through due to thicker cuts, place on a broiler pan and bake at 400 F for 5-10 min.

Recipe Makes: 4 Servings
  • Nutrition Facts are provided for the coating only – Keep in mind that you likely will not need the full ingredients for the coating.
Nutrition per Serving:
  • Calories: 151
  • Total Fat 11.3g
  • Total Carbohydrate 4.2g
    • Dietary Fiber 2.1g
    • Sugars, other 2.2g
    • Net Carbs 2.1g
  • Protein 10.2g
0

I am all about options and when it comes to salads, that certainly does not change. Ranch dressing is easy to grab from the store, but some of the other types of dressing get a little trickier. Here is a great recipe for French Dressing.  I had whipped this together a while back and loved it! Completely forgot to write down what I was throwing into the blender. I can't say for sure that this matches what I originally had, but it is still fairly decent!
This latest batch I used powdered stevia to sweeten. I think next time I would use a combination as I feel there was a bit of an off flavor with the sweetness.  Regardless of the sweetener used, our (non-keto) company really enjoyed this dressing as well!
Let us know what you think! We would love to hear from you!
Ingredients
  • 1/2 cup Olive Oil
  • 2/3 cup Low Carb Ketchup
  • 1/4 cup Sweetener (more to taste)
  • 1/4 cup Apple Cider Vinegar
  • 1/2 tsp Lemon Juice
  • 1/4 cup water
  • 1/2 tsp Paprika
  • 1/4 tsp Salt
  • 1/2 cup diced Onion
  • 1/2 tsp Onion Powder
  • 1/2 tsp Garlic Powder
Directions:
  1. Place all ingredients in a blender and blend until smooth.
Servings: 17
Yield: 2 Tablespoons = 1 Serving
Amount Per Serving
  • Calories 61.79
  • Total Fat 6.37g
  • Sodium 154.03mg
  • Total Carbohydrates 1.38g
    • Fiber 0.12g
    • Sugar 0.84g
    • Sugar Alcohols 0.18g
    • Net Carbohydrates 1.08g
  • Protein 0.08g
0

Missing some great cocktail sauce? I'm sure this would be even better with home made ketchup,
however, I only have so much ambition!
This stuff turned out fantastic and works in a pinch if you don't feel like running to the store for a low carb version of this that you may have found. ( I honestly have never looked at what store bought is. I have learned that on a Keto diet, home made always tastes better!)
Ingredients:
  • 1 cup Low Sugar Ketchup
  • 1 T Horseradish
  • 1/4 tsp Worcestershire Sauce
  • 1/4 tsp Lemon Juice
  • 1/8 tsp Hot Sauce
Directions:
  1. Mix all of the ingredients together and enjoy!
Nutrition: 8 servings
Per serving
  • Calories: 20.3
  • Fat: 0g
  • Carbs: 4.1g
  • Fiber: 0g
  • Protein: 0g
0

Many of us coffee fanatics loved Starbucks or all the other fancy coffees before transitioning to this way of life. If not every day it may have been more as a special treat.
I don't trust what I can't see and will no longer go to fancy coffee shops for any 'treat' coffee. Too many times has something been requested as 'sugar free' and it hasn't been made this way, or there were hidden sugars in their cool whip or other items.
I havent ever been one for a huge need for these fancy coffee's but occasionally it is a great way to sooth a sweet tooth! This Bullet Proof Coffee is packed with fat and flavor!
If you are wanting something with a little less fat, just reduce some of the butter and coconut oil! Get Creative and make it your own ☺.


Ingredients: 
  • 6 oz Coffee; HOT
  • .5 Tblsp Coconut Oil
  • 1 Tblsp Butter; Kerry Gold is the Best!
  • 1 tsp Cocoa Powder
  • 1.5 Tblsp Heavy whipping cream
  • 1/4 Tsp Cinnamon
  • dash salt
  • Sweetener; Your choice

Directions:
  1. Place all the ingredients in a blender.
  2. Blend until whipped together (You should get 1/2-1" of froth)
  3. Enjoy!
Notes: For Sweetener, I like using either Torani French Vanilla syrup or Salted Caramel. Just be sure you are getting the Sugar Free Varieties!

Makes 1 Serving
Nutrition: (Sweetener is not factored into the recipe as it will vary depending on taste.)
  • Calories: 204
  • Total Fat 21.4g
  • Total Carbohydrate 2.5g
    • Dietary Fiber 0.9g
    • Sugars, other 1.6g
    • Net Carbs 1.6
  • Protein 1.4g 2 %
0

My sister had made this recipe for Thanksgiving a few years back. I admit, as much as I should have avoided it, I am glad I tried the high-carb treat. It was fantastic! The original (high-carb) version of this used gingersnap cookies for the crust. That of course, is not an option when sticking with Keto, So I worked some magic using various recipes and came up with this crust substitute.  The crust is perfect for bars, pies etc. My husband tried some raw and felt it tasted a lot like cookie dough.
I would love to hear how this turned out for you! This recipe made (3) 8 1/2" pans of dessert. You can't go wrong!
Crust Ingredients: 
  • 5 cup Almond flour
  • 2/3 cup Erythritol (or any sweetener of choice*; omit for savory pie crust)
  • 1/4 tsp Stevia
  • 1/2 tsp Salt (or 1 tsp for savory pie crust)
  • 1/2 cup Butter (measured solid, then melted)
  • 2 large Eggs
  • 1 tsp Vanilla extract (omit if making a savory crust)
  • 1 tsp Ginger
  • 2 T Cocoa Powder
  • (3) 8.5" straight sided round cake pans
Crust Directions: 
  • Preheat the oven to 350 degrees F
  • Mix together the dry ingredients
  • In a separate dish, mix in the wet ingredients and then combine with the dry ingredients.
  • The dough should be dry and crumbly. Keep mixing until it is uniform and there are no crumbs remaining.
  • Split the dough into 3 equal amounts and press into the bottom an 8 1/2" round cake pan. Carefully poke holes in the surface using a fork to prevent bubbling.
    Bake for 7-10 minutes. Cool slightly before adding the filling (below)
Cheesecake Ingredients:
  • 24 oz Cream Cheese
  • 1 C. Sweetener (equal to sugar, divided in half)
  • 1 tsp Vanilla
  • 3 Eggs, (divided in half)
  • 1 C. Canned Pumpkin
  • 1 tsp ground Cinnamon
  • 1/4 tsp Nutmeg
Cheesecake Directions:
  1. Mix cream cheese, 1/2 C sweetener 1/2 of the eggs and 1/2 tsp vanilla together.
  2. In a seperate dish mix the rest of the sweetener, eggs, vanilla, cinnamon, nutmeg and pumpkin together.
  3. Pour cream cheese into the 3 prepared crusts equally.
  4. Spread out the cream cheese throughout the pan and place dollops of the pumpin on top
  5. Take a butter knife and swirl the pumpkin through the cream cheese mixture.
  6. Bake all 3 at 325 degrees f. for 45-55 minutes.
Makes: 24 servings (8 slices per tin)
Nutrition:
  • Calories: 267
  • Fat: 24.7g
  • Carbs: 6.3g
  • Fiber: 3g
  • Protein: 7.7g
0

This one has always been a family favorite. Often served with rice, which can easily be replaced with cauli-rice or

in this case, shredded cabbage.  It has an earthy taste the quickly becomes something you would crave for comfort food.
We usually made this in a crock pot, however, this time, we made it in the Instant Pot and it turned out GREAT with a fraction of the time.
Ingredients:
  • 1.5 lbs Pork or Chicken
  • 1/4 c. Chopped Onion
  • 16 oz. Diced Tomatoes
  • 1 tsp Chicken Soup Base
  • 1 tsp Marjoram
  • 1 tsp Crushed Thyme
  • 1 tsp Salt
  • Dash of Pepper
Directions:
  1. Chop pork/Chicken into bite size pieces
  2. Place all ingredients into Instant Pot or crock pot
  3. Set Instant Pot to Meat/Stew on High  for 30 Minutes
    1. Release steam at 30 minutes.
  4. For Crock pot – Set on Med/High for 4-6 hours.
  5. Serve with cauli-rice or anything else you’d like

Nutrition: – Makes 6 Servings
Per Serving:
  • Calories: 295
  • Fat: 17.2g
  • Carbs: 2g
  • Fiber: 0.4g
  • Protein: 30.9
0

This one I threw together. I was thinking how much I missed the cheddar broccoli wild rice.
Normally I’m not a fan of cauliflower as a substitute for anything other than cauliflower. I figured this one wouldn’t be so bad since cauliflower and broccoli and cheese go really well together.

I whipped this up and it turned out fairly decent. I know the hubby sure enjoyed it!
Let me know what you think!
Ingredients:
  • 1 Medium Head of Cauliflower, Grated
  • 2 Cups chopped Broccoli crowns
  • 3 Cups Chicken Breast, cut to your likeing
  • ½ Cup Heavy Whipping Cream
  • 1 T Butter
  • 1 tsp Onion Powder
  • 2 tsp Salt
  • 1 ¼ Cups Shredded Sharp Cheddar
  • 1 tsp Black Pepper
  • 3 tsp Minced Garlic
  • 2 tsp Olive Oil
Directions:
  1. Chop the chicken breast into desired bite size or smaller sizes
  2. Place olive oil in pan, add garlic and fry chicken until browned.
  3. Steam broccoli until ALMOST tender. (You can opt different ways to cook your broccoli)
  4. Take Cauliflower and grate it.
  5. In a large skillet place butter and melt it
  6. Once the butter is melted add cauliflower and cook on medium heat, stirring occasionally
  7. After about 5 min, add Heavy Whipping Cream, Onion Powder, Salt, Cheese, and pepper. Stir well
  8. Place lid on pan and stir every couple of minutes until cauliflower is desired texture.
  9. Mix Broccoli and chicken in with the cauliflower and serve.
Nutrition: Servings 8
Per Serving:
  • Calories: 296
  • Fat: 12.3 g
  • Carbs: 6.2 g
  • Fiber: 2.2 g
  • Protein: 34.5g
0

It is easy to make a basic ginger sauce for Chinese food, but sometimes you need to change it up a
bit. I loved Sesame Beef when I wasn't Keto. I haven't mastered making a crunchy thin beef flanks yet to go with the sauce, but this turned out well enough that it worked for the medley we put together.  The recipe is for the sauce only.
The picture definitely does not do any justice for the flavor of the sauce. I would love to hear your thoughts.
Ingredients:
  • 4 tbsp Soy Sauce
  • 2 tbsp Toasted Sesame Oil
  • 2 tbsp  Sukrin Brown Sugar
  • 2 tbsp Vinegar
  • 1 tsp Fresh Ginger
  • 3 tsp Minced Garlic
  • 2 tbsp Sesame Seeds (We skipped these)
  • ½ + tsp Xanthan Gum
  • ½ + Water (Add water to taste to tone down strength)
Throw all of this in one of those bullet blenders and blend away!
We drizzled this over a mix of Shrimp, broccoli, celery, mushrooms and some cabbage. Use a little at a time as the sauce itself can go a long ways You only need enough to coat the food and cook it down a little bit.  IT was FANTASTIC!
Nutrition Facts: Servings: 8
Per Serving:
  • Calories: 52.1
  • Fat: 3.5
  • Carbs: 3.9
  • Fiber: 0.14
  • Protein: 0.51
0

A while back we got Mr. Junkie a Dual function grill. One side is propane the other is charcoal.  Mr. Junkie had a rotisserie for a while but he didn’t have a grill that it fit on. Once we got this grill for him he quickly set up the rotisserie and has been making all kinds of great things on it.
Today was no exception! This beautiful pork loin turned out fantastic! Such a simple recipe and the smells that came from the grill for the 4 hours it was cooking was phenomenal.  I hope you enjoy this as much as our company and we did!
Ingredients
  • 3.5 lbs Pork Loin
  • 2 Tbs Paprika
  • 1/3 Cup Garlic Minced
  • 2 Tbs Soy Sauce
Brine
  • 1/3 Cup salt
  • Water
Water Bath
  • 1 Tbs Apple Cider Vinegar
  • Water
Directions:
  • Place 1/3 cup of salt into a large bowl
  • Add Water (enough to cover the pork loin)
  • Place the pork loin into the water and let it brine overnight
  • Once your Pork Loin has brined, cross cut it about 1/4-1/2 inch deep
  • Rub the minced garlic into the cuts
  • Sprinkle and rub the soy sauce over the Pork Loin
  • Rub the Paprika into the Pork Loin
  • Place on a rottisserie on low heat for 3-5 hours
    • Indirect Heat with a water bath placed underneath.
    • Add 1 Tablespoon of Apple Cider Vinegar to the Water Bath.
Note: If You do not have a grill, use your oven at about 300 degrees F.
Servings: 8
Amount Per Serving
  • Calories 439.48
  • Total Fat 29.91g
  • Sodium 417.2mg
  • Total Carbohydrates 1.94g
    • Fiber 0.62g
    • Sugar 0.23g
    • Sugar Alcohols g
    • Net Carbohydrates 1.32g
  • Protein 38.16g
0

After moving to AZ we found this little hole in the wall Mexican restaurant. Had the coolest entrance door and didn't seem like much at all. Took me a while to locate the restaurant again since we found it when we JUST moved to Arizona and did not have our barrings at all. Susies Mexican Cafe. I highly recommend it. This is where I had Albondigas the first time. This is where my new favorite soup was introduced to me and it was love at first 'slurp'!

I have been looking over several different recipes to find a great way to make this. I have had Albondigas at several different restaurants and the problem I noticed with being low carb is that there is always rice in the meatballs. I searched for a few different ideas that could be used to help hold the meatballs together and found that psyllium husk was a option.  It seemed to work perfectly!

I hope you enjoy the recipe as much as I did!
Normally there is Carrots but I left them out to keep the carb counts down.


Meatballs

  • 1 lb ground beef
  • 1 lb ground pork
  • 2.5 tsp Salt
  • 1.5 Tsp Pepper
  • 1.5 tsp garlic powder ( or 2 cloves garlic)
  • 1.5 tsp Onion Powder
  • 3/4 tsp Chili powder ( I used Ancho)
  • 3/4 tsp Cumin
  • 3/4 tsp Oregano (crushed)
  • 4 - 4.5 T Psyllium Husk (Binder)
  • 1 Egg, beaten


Vegetables

  • 3 Medium Zucchini - Chunked into bite size pieces
  • 3 Medium Summer Squash- Chunked into bite size pieces
  • 1/2 LargeOnion- Chunked into bite size pieces
  • Entire Celery bundle, diced
  • 1 medium tomato, diced  (Keep separate from other vegetables regardless of the picture to the right 😉 )
  • 2 roasted poblanos ,pealed and chopped ( i didn't have these when I made mine)

Soup:
  • 20 Cups of Water
  • 3 T soup base ( Chicken or Beef, or you can do 1/2 and 1/2)
  • 2 tsp Cumin
  • 1 tsp Onion Powder
  • 2 tsp Salt
  • 1.5 tsp Chili Powder
  • Add additional seasonings of the above to create the flavor as desired
Directions:
Meatballs 
  1. Mix all ingredients and form into 1-1.5" meatballs
  2. Brown in a pan on all sides. Do not cook through.
  3. Set aside
Soup
  1. Add all vegetables except the tomatoes once the broth begins to boil
  2. Cover and reduce heat to simmer for 30 min
  3. After 30 min add diced tomatoes
  4. Simmer for another 5 min 
  5. Taste test and add seasonings as desired
  6. ENJOY!!!


This makes about 12-14 Servings


0

MMMmmmmm Corn Dogs! This was one of my 'once in a while' treats before switching to a Keto life style. I loved the crunchiness of Corn Dogs but hated that they had added sweetness. All the advertising for 'Honey Batter'! It would frustrate me to no end! Not everyone likes sweet!

Since switching to the Keto lifestyle we have found some amazing recipes. This is one of them.
I found it on a Reddit Page and have to give SuperSpaldo707 all of the credit! These are fantastic! I am sure I will be posting more of their recipes as I try them.

Ingredients:

  • 1 C Powdered Parmesan (Parmesan from the shaker cans)
  • 1 Large Egg
  • 1 T Coconut Flour (This helps with texture)
  • 2 T Water
  • 5 Hot Dogs


Directions: 

  1. Mix all together and season to your liking
  2. Take a Hot Dog and press the dough around it. 
  3. Once the hot dog is fully wrapped you can fry this in your choice of oil ( I used Coconut oil)
  4. Fry until golden and drain on a paper towel.
  5. ENJOY!


Notes:

  • I added some onion powder, salt and ancho chili powder to add some extra flavor. I didn't want the corn dogs to taste completely of Parmesan.
  • I also cut the hot dogs in half and made mini hot dogs
  • When I made this recipe I was able to cover 4 full length hot dogs. With some practice I'm sure I could get all 5. 
  • When Frying in a pan, roll the corn dog for the first 5 seconds in the oil so it doesn't stick to the bottom of the pan. 


0