Menu
Showing posts with label Dessert. Show all posts


My husband always talked about how much he liked pecan pie. He has been a real trooper and limits himself with things since I was diagnosed with diabetes. Now that we are both following keto Pecan Pie was a bit out of reach. These things, are very impressive! Very Very good. Sure to cause heartburn in those that get it from sweets!

We did not use the full amount of sugar, and I'm really glad we didn't. They are very sweet! This recipe comes from All Day I Dream About Food. She really is impressive and I recommend reviewing some of her other recipes as well!

INGREDIENTS
CRUST
  • 1 1/4 cups almond flour
  • 1/4 cup Swerve Sweetener
  • 1/4 tsp salt
  • 1/4 cup butter, chilled, cut into small pieces
PECAN PIE FILLING
  • 1/2 cup butter
  • 2/3 cup powdered Swerve Sweetener
  • 2 tsp Yacon syrup (optional, helps with color and flavor)
    • I did not have Yacon Syrup and instead used Black Strap Molasses
  • 1 1/2 tsp vanilla extract
  • 1/2 cup heavy whipping cream
  • 2 large eggs
  • 1/4 tsp salt
  • 1 cup pecans, lightly toasted
  • 2 ounces Lily's Dark Chocolate, chopped
INSTRUCTIONS
Crust:
  1. Preheat the oven to 325F.
  2. In a food processor, combine the almond flour, sweetener, and salt. Pulse a few times to combine. Scatter the butter pieces over top and pulse until mixture resembles coarse crumbs.
  3. Press into the bottom of a 9x9 inch pan and bake 12 minutes or until the edges are just turning golden.
Pecan Pie Filling:
  1. In a medium saucepan over low heat, melt the butter. Stir in the powdered sweetener and Yacon syrup and whisk until well combined. Remove from heat.
  2. Whisk in the vanilla extract and cream. Add the eggs and salt and whisk until fully incorporated.
  3. Scatter the pecans and chopped chocolate over the crust and pour the filling overtop. Bake 20 to 25 minutes, until the filling is mostly set (if you want them gooey, make sure the middle still has a little jiggle to it when the pan is shaken).
  4. Remove and let cool at least 30 minutes before cutting into bars.
by Carolyn
Nutrition Facts: Per Serving (1 bar)
Servings per Recipe: 16
  • Calories: 222
  • Fat: 21.12 g
  • Carbs: 4.92g
  • Fiber: 2.24g
  • Protein: 3.65g

0


This was a quick little creation that sounded really good. I used to love jello powder in cottage cheese mixed with fruit, but that has far too many carbs than I care to even think about.
These little things are great in a pinch and a fat bomb to boot! I've made them a couple times now and they are almost addicting!
Whats great is you can make these in any flavor you choose! Don't want to use pre-packaged jello? use gelatin or Xanthan gum and different flavors! The sky is the limit! Let your imagination run wild!
We would love to hear what you tried with yours!

Coconut Rolled Jello Fat Bombs

Servings: 20 Fat Bombs
Ingredients
  • 8 oz Cream Cheese Softened
  • 8.5 g Sugar Free Jello- Any Flavor
  • 1 cup Unsweetened Coconut Flakes
  • 1 packet Stevia
Directions:
  1. Soften the Cream Cheese
  2. Add the SF Jello and Stevia packet and mix well
  3. Chill in the refrigerator for approximate 10-15 min. This will allow the mixture to be more easily formed into balls.
  4. Roll mixture into 1" balls and then roll through coconut flakes to coat.
  5. Store in the fridge and enjoy!
Alternate options: Roll in ground almonds or almond flour. This option is one of my favorites.
Makes: 20 Fat Bombs
Nutrition Facts per Jello Ball:  (Coconut Jello Fat Bombs)
  • Calories: 50
  • Fat 4.5g
  • Carbohydrate 0.7g
    • Dietary Fiber 0.2g
    • Sugars, other 0.6g
      • Net Carbs: 0.5g
  • Protein 0.9g

Almond Coated Jello Bombs


Ingredients
  • 8 oz Cream Cheese Softened
  • 8.5 g Sugar Free Jello- Any Flavor
  • 1/2 cup Unsweetened Coconut Flakes
  • 1 packet Stevia
  • 1/2 cup Almond Flour (Not likely to use all of it)
Directions:
  1. Soften the Cream Cheese
  2. Add the SF Jello and Stevia packet and mix well
  3. Chill in the refrigerator for approximate 10-15 min. This will allow the mixture to be more easily formed into balls.
  4. Mix in coconut flakes,
  5. Roll mixture into 1" balls and then roll through coconut flakes to coat.
  6. Store in the fridge and enjoy!

Serving Size: 1 Serving (21g)
Recipe Makes: 20 Servings
Nutrition Per Serving: (Almond Coated Jello Bombs)
  • Calories: 56
  • Total Fat 4.9g
  • Total Carbohydrate 1g 
    • Dietary Fiber 0.5g
    • Sugars, other 0.5g
      • Net Carbs: 0.5 g
  • Protein 1.5g
0

This is quite the treat, tastes like your normal bars with an 'Almond Joy' twist. This little bit makes a surprising amount and will surely be a hit with guests!
Another great perk - this is SUPER simple to make! Very few dishes and tastes like it would take much more effort!
Servings: 8
Cooking Times
  • Preparation Time: 5 minutes
  • Inactive Time: 20 minutes
  • Total Time: 25 minutes
Ingredients
  • 1 cup Lilys Stevia-Sweetened Chocolate Chips
  • 1 Tbs Coconut Oil
  • 1 cup Sliced Almonds
  • 1/4 cup Unsweetened Coconut Flakes
  • Coarse Pink Salt or Sea Salt for Sprinkling
Directions:
  1. In a microwaveable container, melt chocolate chips with coconut oil. Start with 1 minute, stir, then stir every 30 seconds until smooth.
  2. Add sliced almonds and stir well.
  3. Spread mixture onto a parchment or wax paper
  4. Sprinkle with coarse salt and unsweetened shredded coconut
  5. Freeze for 20 minutes.
  6. Break into bite size pieces.
  7. Store in fridge or freezer.

Nutrition Facts
Serving size: 1/8 of a recipe (0.5 ounces).
Amount Per Serving
  • Calories 74.55
  • Total Fat 6.81g
  • Sodium 59.08mg
  • Total Carbohydrates 3.73g
    • Fiber 1.53g
    • Sugar 0.32g
    • Sugar Alcohols 0.76g
    • Net Carbohydrates 1.44g
  • Protein 1.81g
Recipe Type: Dessert
0

My sister had made this recipe for Thanksgiving a few years back. I admit, as much as I should have avoided it, I am glad I tried the high-carb treat. It was fantastic! The original (high-carb) version of this used gingersnap cookies for the crust. That of course, is not an option when sticking with Keto, So I worked some magic using various recipes and came up with this crust substitute.  The crust is perfect for bars, pies etc. My husband tried some raw and felt it tasted a lot like cookie dough.
I would love to hear how this turned out for you! This recipe made (3) 8 1/2" pans of dessert. You can't go wrong!
Crust Ingredients: 
  • 5 cup Almond flour
  • 2/3 cup Erythritol (or any sweetener of choice*; omit for savory pie crust)
  • 1/4 tsp Stevia
  • 1/2 tsp Salt (or 1 tsp for savory pie crust)
  • 1/2 cup Butter (measured solid, then melted)
  • 2 large Eggs
  • 1 tsp Vanilla extract (omit if making a savory crust)
  • 1 tsp Ginger
  • 2 T Cocoa Powder
  • (3) 8.5" straight sided round cake pans
Crust Directions: 
  • Preheat the oven to 350 degrees F
  • Mix together the dry ingredients
  • In a separate dish, mix in the wet ingredients and then combine with the dry ingredients.
  • The dough should be dry and crumbly. Keep mixing until it is uniform and there are no crumbs remaining.
  • Split the dough into 3 equal amounts and press into the bottom an 8 1/2" round cake pan. Carefully poke holes in the surface using a fork to prevent bubbling.
    Bake for 7-10 minutes. Cool slightly before adding the filling (below)
Cheesecake Ingredients:
  • 24 oz Cream Cheese
  • 1 C. Sweetener (equal to sugar, divided in half)
  • 1 tsp Vanilla
  • 3 Eggs, (divided in half)
  • 1 C. Canned Pumpkin
  • 1 tsp ground Cinnamon
  • 1/4 tsp Nutmeg
Cheesecake Directions:
  1. Mix cream cheese, 1/2 C sweetener 1/2 of the eggs and 1/2 tsp vanilla together.
  2. In a seperate dish mix the rest of the sweetener, eggs, vanilla, cinnamon, nutmeg and pumpkin together.
  3. Pour cream cheese into the 3 prepared crusts equally.
  4. Spread out the cream cheese throughout the pan and place dollops of the pumpin on top
  5. Take a butter knife and swirl the pumpkin through the cream cheese mixture.
  6. Bake all 3 at 325 degrees f. for 45-55 minutes.
Makes: 24 servings (8 slices per tin)
Nutrition:
  • Calories: 267
  • Fat: 24.7g
  • Carbs: 6.3g
  • Fiber: 3g
  • Protein: 7.7g
0


I have read several different options for making apple pie and I have been eagerly looking forward to trying the different options. I have listed both options below as they are both very tasty and make a great dessert. I do feel, however, that the Chayote makes a closer 'Apple Pie' texture than the Jicama does.

The flavor of both are phenomenal though!

I did only make the filling and did not make a full apple pie with crust etc. So I have listed the fillings below. Once I try a crust I will list this as well.

As with most of my recipes, I want to give the original poster credit.
I obtained both recipe from Low Carb Yum. If you want to peruse her comments regarding the recipe you can access the Chayote Recipe  and the Jicama Recipe by clicking on the links.


Chayote Recipe

This recipe would be PERFECT for apple pie or any other recipe that calls for baked apples. Perhaps even baked apple cake, or baked apple bread! The texture is very similar to that of baked apples and the flavor is fantastic!

Ingredients
  • 5 medium chayote squash
  • 3/4 cup sweetener
  • 1 tablespoon xanthan gum
  • 1 tablespoon lemon juice
  • 2 teaspoons apple extract
  • 1/3 cup butter cut in small pieces
  • 1 tsp Apple Pie Spice
    • Alternate options to this would be to use a blend of 
      • Cinnamon
      • Cloves
      • Nutmeg
Directions:

  1. Peel chayote and cut into slices.
  2. Boil sliced chayote until fork tender. Drain. Return to pot.
  3. Add sweetener, xanthan gum, lemon juice, and apple extract to cooked chayote squash and Apple Pie Spice.
  4. Add Butter and mix together once melted


Jicama Recipe

The Jicama recipe I had cooked a lot longer in hopes to cook out some of the 'crunch' from the jicama. There jicama carmelized and the crunch never did dissipate. It was more like eating a fresh unbaked apple with a baked apple taste. Still very good, but not sure I would want this option for a pie. It was fantastic with cool whip!

Ingredients
  • 4 cups jicama chopped
  • 1/2 cup Swerve
  • 1/2 cup butter
  • 1 tablespoon cinnamon
  • 1/4 teaspoon nutmeg
  • 1/8 teaspoon cloves
  • 2 teaspoon apple extract
  • 1 teaspoon vanilla extract

Directions:
  1. Combine chopped jicama with butter, sweetener, and spices in a pan.
  2. Cook and stir over medium heat until jicama has softened.
  3. At end of cooking, stir in apple and vanilla extracts.
  4. Serve warm.
  5. Can be refrigerated for up to a week or frozen for several months.
0

Found this recipe from one of my favorite bloggers (All Day I Dream About Food). She comes up with some fantastic things!

My husband was actually pushing me to make these for a few days so I finally made them! I have to say they are absolutely delicious! Shared them out with some friends and they were huge fans as well. The best thing - they are super easy to make and the recipe makes quite a bit! With the mold that I have I could have made about 8-10 more with how small the Popsicle are.

Hope you all enjoy this one:) Especially now that warm weather is approaching!  They have a lemon strawberry flavor that is very refreshing!

These went too fast and I did not get a finished picture but I know I will be making them again! :)

Ingredients:

  • 8 oz cream cheese, softened
  • 1 cup cream
  • 1/3 cup powdered Swerve Sweetener or other powdered erythritol - I used a little swerve and a little truvia. Niether were powdered. I just ran them in the blender for a little bit
  • 1/4 tsp stevia extract
  • 1 tbsp lemon juice
  • 2 tsp lemon zest
  • 2 cups fresh strawberries, chopped, divided

Directions:
  1. Place cream cheese in a food processor and process until smooth. ( I used a blender- The processor would probably worked a bit better, but if you don't have one, the blender will still work)
  2. Add cream, powdered erythritol, lemon juice, lemon zest and stevia extract. Process until well combined.
  3. Add 1 1/2 cups of the strawberries and process until almost fully smooth. Stir in remaining chopped strawberries.
  4. Pour mixture into popsicle molds and push popsicle sticks about 2/3 of the way into each (I recommend getting wooden sticks, as they tend to grip the mixture better and don't come out when you are trying to unmold the popsicles).
  5. Freeze at least 4 hours. To unmold, run under hot tap water for 20 to 30 seconds, and then twist stick gently to release.

NUTRITION - Taken from the blog listed above

Serves 12. Each serving has 3 g of carbs and 1 g of fiber. Total NET CARBS = 2 g.

122 Calories; 12g Fat (83.6% calories from fat); 2g Protein; 3g Carbohydrate; 1g Dietary Fiber; 38mg Cholesterol; 63mg Sodium


0

I have been craving chocolate for the last few days. ( Or always lol) and came across a post for Chocolate cake from Low Carb Yum. The comments on the post were incredible so I had to try it for myself.

Don't let the ingredients deter you. You cannot tell that there is Zucchini in this at all and it is incredibly moist! Its just like box cake but BETTER! 😁

I also found a recipe for the Coconut frosting that goes perfecting with German Chocolate Cake. And it is great! I can't say enough good things about these recipes.

I unfortunately did not take as many pictures as I normally do so hopefully I will remember to take pictures next time I makes this. I can guarantee that this will be made again!

Ingredients

  • 1 cup coconut flour
  • 1 cup unsweetened cocoa powder
  • 3/4 cup artificial sweetener
  • 1/4 Truvia
  • 1 teaspoon cinnamon
  • 2 teaspoons baking soda
  • 2 teaspoons baking powder
  • 1/2 teaspoon sea salt
  • 1/2 cup coconut oil melted
  • 8 large eggs beaten
  • 2 teaspoons vanilla extract
  • 4 cups zucchini shredded

Directions:

  1. In large mixing bowl, combine coconut flour, cocoa, sweetener, cinnamon, baking soda, baking powder, and sea salt.
  2. Mix in eggs, coconut oil, and vanilla until well combined.
  3. Stir in zucchini 
  4. Spread out into greased 9x13-inch pan (or two round 9-inch pans).
  5. Bake at 350°F for about 40 minutes or until toothpick inserted in center comes out clean.
  6. Cool on wire rack. Once cool, frost with desired frosting.

There are many different  frosting options available however I only made the coconut frosting as it is one of my favorites on this kind of cake. 

Pecan Coconut Frosting - From Low Carb Yum
(I have doubled from the original recipe provided by Low Carb Yum to cover the 9x13 cake) 

Ingredients  
  • 1 cup unsweetened almond milk
  • 1 cup sweetener I used Swerve Confectioners Powder
  • 2 egg yolk
  • 1/2 cup butter
  • 1/2 teaspoon xanthan gum optional
  • 1 teaspoon vanilla extract
  • 1.5 cup unsweetened shredded coconut
  • 1 cup chopped pecans
Directions: 
  1. Combine almond milk, sweetener, egg yolk and butter in a saucepan.
  2. Heat over medium heat. When bubbles form, sprinkle in xanthan gum.
  3. Continue heating until thickened.
  4. Remove from heat and stir in vanilla, coconut and pecans.
  5. Spread mixture over cooled cake.


The Cake recipe yields 24 servings and the frosting is plenty enough for the entire cake.

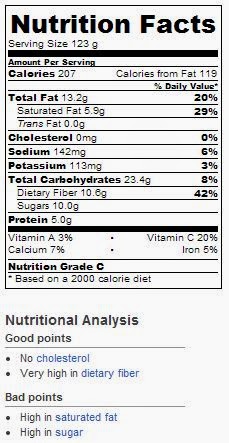
Frosting Nutritional Facts

Cake Nutritional Facts


0

Before being diabetic I hated chocolate. About 2 months before being diagnosed my chocolate loving switch was flipped and of course now that I am diabetic - it's not the best thing in the world for me.
I've never been much for fudge and I have never made a regular batch of fudge either. But this stuff is actually pretty darn good!

It is very rich so small pieces are plenty!
I obtained this recipe from lowcarbyum's blog.

INGREDIENTS

  • 2/3 cup powdered sweetener (Sukrin Melis* or Swerve Confectioners) I used a combination of powdered swerve and straight erythritol.
  • 1/2 cup peanut butter
  • 1 teaspoon vanilla extract
  • 1/4 cup coconut oil or ghee
  • 1/4 cup coconut milk
  • 1 1/2 tablespoon cocoa


INSTRUCTIONS

  1. Line a small container with parchment paper. (I used 7.5 x 5 size)
  2. Place sweetener, peanut butter, and vanilla extract in medium bowl. Set aside.
  3. Mix coconut oil, milk, and cocoa in small saucepan. Bring to a boil.
  4. Pour hot mixture over the ingredients in medium bowl. Stir until well combined.
  5. Spread into prepared container. Allow to cool in refrigerator. Slice into squares. Store in the fridge.


Nutrition facts are from the blog I obtained the recipe from. It is always good to recheck nutrtion facts for yourself. 
Makes 28 small squares (about 3-4 squares per serving)

Nutrition per square: 50 calories, 4.8g fat, 22mg sodium, 1.2g carbs, 1.2g protein, 5.7g erythritol
0

I love lemon bars but there are so many recipes out there that are either too tangy or too high carb or too sweet.  I think I finally found one that is perfect. The only thing I think I would change is the crust slightly - Its a bit crumbly. Still good though.

I did modify the recipe I made slightly to avoid the tangy flavor. So what you see is the what I did.

For the Crust:
  • 6 Tbl butter
  • 2 cups almond flour
  • ⅓ cup granulated sugar substitute 
  • 2 Tsp Lemon Extract

For the Filling:
  • ½ cup butter
  • ½ cup granulated sugar substitute 
  • ½ cup fresh lemon juice
  • 2 tsp Lemon Extract
  • 6 egg yolks
  • ½ tsp xanthan gum
  • 2 Tbsp unflavored gelatin 
  • 1/4 C Powdered Erythritol (If you have granulated you can grind it to powder)
Direction:

For the crust:
  1. Melt the butter in the microwave or a small saucepan. 
  2. Add the almond flour, sweetener, and lemon extract, stirring until fully combined. 
  3. Press the dough evenly along the bottom and ½ inch up the sides of an 8 x 8 inch square pan.
  4. For best results line the pan with parchment paper or foil first, then you can simply lift out the completed lemon bars. ( I did not line the pan)
  5. Bake at 350 degrees (F) for 10 minutes. 
  6. Remove and cool while you make the filling.

For the filling:
  1. Melt the butter in a small saucepan on low heat. 
  2. Remove from heat and whisk in sweetener, lemon juice, and lemon extract until dissolved. 
  3. Whisk in the egg yolks and return to the stove over low heat. 
  4. Whisk continually until the curd starts to thicken. 
  5. Remove from the heat and strain into a small bowl. 
  6. Whisk in the the xanthan gum and gelatin until dissolved and smooth.
  7. Pour the filling over the pre-baked crust and spread out evenly to the edges of the pan. 
  8. Bake the bars at 350 degrees (F) for 15 minutes. 
  9. Remove and cool. 
  10. Sprinkle with Powdered Swerve before serving if desired. 
  11. Cut into sixteen 2 x 2 squares.


The filling would also make an excellent filling for Lemon Meringue Pie. Though I would add more sweetener to the filling since we would not be adding in the powdered erythritol.


Nutrition Facts Per Serving:

  • Calories: 197.9
  • Fat: 18.7g
  • Carbs: 8
    • Fiber: 1.6
    • Sugar Alcohol: 3g
    • Sugars: 1.7g
    • Net Carbs: 3.4g
  • Protein: 4.6g


0

My husband and I decided to meal prep for a week. I have been horrible with craving sweets lately and with nothing prepped I've been going after every high carb thing I could grab - BAD ME!

So - I decided to make cookies and mini cheese cake.
Cookies are a classic and have been posted earlier.
The cheese cake recipe I found was one of those Facebook video/posts that looked really good.

Peanut Butter Mini Cheese Cakes.

Personally a bit rich and peanutbuttery for me, but they were still good.

Ingredients:

  • 30 Ritz Crackers
  • 1/2 cup Peanut Butter
  • 1/2 c sour cream
  • 16 oz Cream Cheese
  • 1/2 c. Sugar
  • 1 tsp Vanilla
  • 2 Eggs

Directions:
  • Form peanut butter sandwiches with Ritz crackers. 
  • Place them in the bottom of each cup of a muffin tin. 
  • In a large bowl beat together 16 oz cream cheese, 1/2 cup sugar. 
  • Then add 1/2 cup peanut butter, 1/2 cup sour cream, 1 tsp vanilla, 2 eggs, and beat again. 
  • Pour mixture over each peanut butter sandwich until each cup is 3/4 full. 
  • Top with crushed Ritz cracker. 
  • Bake for 22 minutes at 275°F. 
  • Let cool completely and then refrigerate 2 hours.

I think I messed up the recipe when we originally made it. I think I did a full cup of PB instead of half.  I might try to make them again another time.  

Enjoy and let us know what you think!

Servings: 15


0

My Uncle was recently diagnosed with diabetes and his (and My) birthday is tomorrow. I asked him what he wanted for a cake/pie/dessert and I would make it diabetic friendly.  He wanted lemon meringue pie. So.. Here is what I found. This was taken from this website - here.

Please see my notes at the very bottom of the recipe:


Ingredients:
 
Crust: 
  • 1/2 cup ground almonds
  • 1/3 cup(33grams) half or whole pecans
  • 2 Tablespoons melted unsalted butter
  • 1 Tablespoon Splenda
  • 1/4 tsp ground cinnamon


Filling: 
  • 2 whole large eggs
  • 3 large egg yolks
  • 1/2 cup Sugar Substitute
  • 1/2 cup fresh lemon juice 
  • 1 1/2 tsp lemon zest (I used Lemon extract)
  • 3 Tablespoons unsalted butter
  • pinch of salt


Meringue: 
  • 4 Large Egg Whites
  • 1/4 cup Sugar Substitute
  • 1/4 tsp cream of tartar
  • pinch of salt


Instructions:
Preheat oven 350F

Crust: 
  1. In food processes(or magic bullet or coffee grinder) pulse pecans till a mill texture(like the ground almonds)
  2. In small bowl mix all ingredients
  3. Spray 5 individual serving pie pans with cooking spray
  4. Divide crust mixture among pans, about a Tablespoon per pan.
  5. Press down with your finders firmly on the bottom, not sides though like a traditional pie(IF you want it to have crust all up the sides you would have to double crust recipe + add the extra carbs, so that was not happening for me  )
  6. Bake crust at 350F for 8 minutes
  7. Let cool at room temperature while making filling

  Filling:

  1. Add all filling ingredients to a small heavy bottom saucepan. Whisk over MED heat till mixture starts to become thick.
  2. Using a fine mesh strainer, strain the mixture(this gets out all lemon seeds and any cooked egg bits you might have)
  3. Divide filling mixture among the 5 pie pans equally, about 1/4 cup per pie.
  4. Set in fridge to cool at least 1/2 hour.

  
Meringue:
  1. Put egg whites in mixer bowl, add salt.
  2. Mix till frothy.
  3. Add cream of tartar & splenda.
  4. Mix till you have a firm meringue/Stiff peaks, about 2-3 mins.


Assembly:

Preheat over to 500F
Divide Meringue equally among the 5 chilled pie's
Spoon on and smooth with small spatula
Bake at 500F for 8 minutes
Let pies cool, then refrigerate
Serve cold


Nutritional Information:
Energy 288 kcal
Carbohydrate, by difference 9.57 g
Sugars, total 1.66 g
Fiber, total dietary 1.91 g
Protein9.84 g

Total lipid (fat)25.68 g

MY NOTES
To ensure that the sweetener wasn't very off-puting ( my uncle hates artificial sweetener) I used the Truvia baking blend which has a combination of Stevia, Erythritol, and Cane Sugar. It requires 1/2 the amount of sugar called for in a recipe. So if a recipe states 1 cup, you would only use 1/2 cup of Truvia.  This unfortunately does raise the carb count a little bit.  

After tasting the pie, halving the listed sugar in the recipe could be reduced even further as it turned out still very very sweet. My recommendation would be (if using Truvia baking blend)

Crust: 1/2 Tablespoon
Filling: 1/8 Cup
Meringue: 1 Tablespoon

When doing the meringue I goofed up and just dumped everything into my kitchen aid at once and just whipped the hell out of it. It seemed to be just fine. The recipe states to flatten the meringue but I like peaks. So I shortened the bake time by 1 minute to avoid burning the meringue too much. 

The nutrition detail I have listed below is using the Truvia Baking Blend. 

0


I use to love cobber and crisps. (Still Miss Crisps. Especially apple crisp!) But this comes in handy in a pinch and is extremely easy to make. 

It has a lot of flavor as well. 


INGREDIENTS:
  • 1 Cup Carbquik - (Carbquick can be purchased here.)
  • 1/2 Cup Milk ( I used unsweetened Coconut Milk)
  • 2 T Oil 
  • 1 Cup Sugar (sweetener equivalent)
  • 2 Cups Berries
  • 3/4 cup Water (Include Juice from berries if frozen)
  • 1/2 Cup Sugar (sweetener equivalent)
DIRECTIONS:

1. Mix breading portion of the Cobbler together and spread out into an 8x8 baking dish.


2. Mix Berries, water and sugar and pour on top of the dough.


3. Bake at 375 degrees for 30 min or until dough is baked through.
4. Let sit for 20 min to set up before eating.
5. Serve with Ice cream or cool whip.


Values below are for approx. 6 servings.

0

I never thought I was going to be able to have biscuits and jam again. Or Biscuits and gravy! I am now one step closer to getting one of my favorite breakfasts.

I tried 'CHEF GREG'S COUNTRY-STYLE BAKING POWDER BISCUITS' from genaw.com and I have to say they are FANTASTIC! I didn't get the count they estimated for their recipe. I cut the recipe in half because I didn't want to waste that much Carbquik in case the recipe didn't pan out. 

My answer to them- YUM!!!!

The Recipe is as follows: This recipe is 1/2 the original recipe and Yielded 4.5 biscuits. If you want more just double everything except the salt.


Ingredients:
  • 1 cups Carbquik**, 3 ounces (I weighed this on my scale and went by the oz instead)
  • 1/2 tablespoon baking powder 
  • Pinch salt, optional (see comment below) - I skipped this. I would likely add it back in.
  • 2 tablespoons cold butter, cut in small bits 
  • 1/8 cup heavy cream 
  • 1/8 cup water
  • I added a tsp of Chicken soup base( powdered)
Directions:
  1. Lightly spoon the Carbquik into a measuring cup and level off. Do not tap it. - Again I used Oz measurement instead of a measuring cup. 
  2. Place in a medium mixing bowl. Whisk in the baking powder and salt, if using. 
  3. Cut the cold butter into the Carbquik until it looks like coarse meal. -I used the kitchen aid to cut the butter in. It turned out looking like meal but felt like flour with no butter addition. 
  4. Mix the cream and water; pour into the dry mixture. Mix until the dough forms and comes together, but do not overwork. The dough should be somewhat loose and sticky. 
  5. On parchment paper, very gently pat or roll the dough to 3/4-inch thick. It helps to sprinkle about 2 tablespoons of Carbquik over the top of the dough to prevent sticking.-I think mine were approx 1/2 an inch thick. 
  6. Cut with a 2-inch biscuit cutter.  
  7. Place the biscuits on an ungreased baking sheet and bake at 400º 8-10 minutes until golden brown.
** Just because I was curious. I weighted each biscuit before baking them. They were approx: 37g each.  This will give you an idea of the size mine were. 

Let us know if you try these and what you thought!


This is calculated for 4 servings. 
Nutrition Facts per Serving:

  • Calories: 125
  • Fat: 11.2g
  • Carbs: 11.6g
    • Fiber: 9.3g
    • Net Carbs: 2.3g
  • Protein: 4.1g

0

I downloaded a book that had some low carb recipes in it. Unfortunately the book didn't have any of the nutrition information. So, after checking the ingredients and making sure it would actually be low carb, I made these little gems. They turned out great! Very moist.

I didn't have a muffin tin to make large muffins so I made approx 10 regular muffins.


Ingredients:
  • 1/2 Cup Soy Flour
  • 1/2 Cup  Almond Flour 
  • 2 tsp Baking Powder
  • 1/2 Cup Sweetener
  • 1 tsp vinegar
  • 2 Eggs
  • 1/2 Cup Heavy Cream
  • 1/3 Cup Club Soda
  • 1/2 Cup Blueberries

Directions:
  1. Mix everything together except for the blueberries. 
  2. Once everything is mixed well, fold in the blueberries. 
  3. Put muffin paper in a 6 cup pan. 
  4. Fill 2/3 of the way. 
  5. Bake at 375 degree's for 25 Minutes.
The book this recipe came from is: 42 Low Carb Breakfast Recipes: Quick & Easy Weight Loss  by Jennifer Goodwell

The nutrition facts are for 6 muffins. It also does not include the sweetener as all sweeteners are a bit different. Just be sure to account for the sweetener you choose to use. 


0

I found a fantastic recipe for low carb chocolate chip cookies.  I was a little leary as the recipe itself seems a bit daunting.  But...  Perfection.

I like mine a little crunchy and chewy.  To obtain this I baked the cookies a bit longer than most probably would.  It made the bottom of the cookie crunchy and the top chewy.

I found the recipe from lowcarbfriends.com.  Excellent source for low carb recipes.

Chocolate Chip Cookies
  • 3C Carbquick 
  • 1tsp baking soda
  • 2 eggs
  • 1C Poly dextrose fiber
  • 1C unsalted butter (lightly softened) 
  • 1/2C Erythritol 
  • 1/2C Vanilla Designer Whey Protein (I used plain) 
  • 1T vegetable glycerin (I didn't have this and skipped it.) 
  • 1T Molasses 
  • 1/2t liquid splenda
  • 1t vanilla 
  • 2C (12oz) Mini carb semi-sweet chocolate morsels
Directions:
  1. Beat eggs and poly dextrose until smooth. Add butter and mix well. 
  2. Add sweeteners, molasses, and vanilla until creamed. 
  3. In a separate bowl combine carbquick and baking soda.  
  4. Gradually combine dry mixture with the wet mixture.  Mix until smooth. 
  5. Add chocolate chips
  6. Drop by heaping tablespoon onto ungreased baking sheets covered by parchment paper. 
  7. Preheat oven to 375. 
  8. Bake 7-13 Minutes until golden brown.  (time varies by oven) 
  9. Remove and let stand out on pan for 3-5 min. Move to cooling rack to further cool.

0

I obtained this recipe from Linda's Low Carb Recipes. 


This is a FANTASTIC Cheesecake recipe and has quickly become a favorite in the house hold. I made a "regular" version of this with actual sugar for my non-diabetic friends and my husband had the idea to add melted caramel to that version. It turned out fantastic. (Of course I had to have a taste!)

**If you don't find the need to make this low carb, you can replace the equal/spenda with real sugar and the carbalose flour with regular flour.
_____________________________________________________________________________

Note: To follow a Keto/Gluten Free recipe, substitute the crust with a ground pecan/almond crust instead.

Ingredients:

Crust:
 (Another great crust is making it out of Ground Pecans, Sweetener and butter)

  • 1/3 cup granular Splenda or equivalent liquid Splenda 
  • 1/3 cup plus 1 tablespoon butter, softened 
  • 1/4 teaspoon vanilla 
  • 1 cup Carbalose flour *

Filling: 
  • 16 ounces cream cheese, softened 
  • 1/2 cup granular Splenda (
  • 1/2 teaspoon vanilla 
  • 2 eggs

Topping: 
  • 2 cups granny smith apples, peeled and sliced, 8 ounces (don't slice too thin) 
    • Chayotee is a great lower carb option. Add in a bit of Apple Pie Spice.
  • 1/3 cup granular Splenda (do not use liquid Splenda) 
  • 1 teaspoon cinnamon 
  • 1/4 cup sliced almonds, 1 ounce
Directions:

  1. In a medium bowl, beat the first 3 crust ingredients on medium speed; stir in the flour until a soft dough forms. 
  2. Pat onto the bottom and just slightly up sides of a 9-inch springform pan. Set aside.
  3. Place the apples in a single layer on a baking sheet. You may want to line it with a silicone liner because the apples will stick. Cover with foil and bake at 400º 15 minutes. ** Instead of baking the apples, I fried them in a pan with equal and cinnamon
  4. Meanwhile, in the same medium bowl that you used for the crust, beat the cream cheese, 1/2 cup Splenda and 1/2 teaspoon vanilla until fluffy. Add the eggs; beat on low speed just until combined. Pour into the prepared pan. Arrange the warm apples atop the filling.
  5. In a small bowl, mix 1/3 cup granular Splenda and cinnamon. Sprinkle the almonds evenly over the apples, then cover with the cinnamon-Splenda mixture. It will seem like an awful lot of cinnamon mixture, but you'll be glad that you put it all on there. Bake at 400º 40 minutes until golden brown. Cool, then remove the sides of the pan. I didn't like the dry, powdery look of the granular Splenda on top so I sprayed it lightly with a water mister to melt the Splenda. Chill at least 4 hours before serving.

Makes about 8-12 servings
Can be frozen

* I haven't tried this myself yet, but I've heard that you can substitute Carbquik for the Carbalose flour. I haven't calculated the counts though, but they should be similar.

** I've discovered an easier method for cooking the apples. Place the apple slices in a single layer in a glass 9x13" baking dish. Microwave on HIGH about 4 minutes or until softened and somewhat limp.

With granular Splenda: 
Per 1/8: 384 Calories; 33g Fat; 11g Protein; 15g Carbohydrate; 5g Dietary Fiber; 10g Net Carbs 
Per 1/12: 256 Calories; 22g Fat; 7g Protein; 10g Carbohydrate; 3g Dietary Fiber; 7g Net Carbs

With liquid Splenda:
Per 1/8: 374 Calories; 33g Fat; 11g Protein; 13g Carbohydrate; 5g Dietary Fiber; 8g Net Carbs
Per 1/12: 249 Calories; 22g Fat; 7g Protein; 8g Carbohydrate; 3g Dietary Fiber; 5g Net Carbs


This is my low carb version of a wonderful cheesecake recipe from my cousin, Laurie. All I did was substitute Splenda for the sugar and use Carbalose flour instead of regular flour in the crust. I also reduced the amount of apples by 2 cups to save carbs. This has got to be about the best low carb dessert I've ever eaten. No one will know that this is low carb, especially if you top it with some whipped cream or Whipped Topping (not included in carb counts). There is just enough apple to give it the right flavor, but not enough to be outrageously high in carbs. They add just 2-3 net carbs per serving. The crust is nice and flaky and this dessert reminds me of a cross between apple strudel and apple Danish. The cheese filling isn't overly sweet, so you may want to add a touch more sweetener if you like your cheesecake sweeter. Between the Whipped Topping and the sweet cinnamony apples, I don't think it really needs to be sweeter.

Below you can see a slice of the cheesecake:
0