Menu

Missing some great cocktail sauce? I'm sure this would be even better with home made ketchup,
however, I only have so much ambition!
This stuff turned out fantastic and works in a pinch if you don't feel like running to the store for a low carb version of this that you may have found. ( I honestly have never looked at what store bought is. I have learned that on a Keto diet, home made always tastes better!)
Ingredients:
  • 1 cup Low Sugar Ketchup
  • 1 T Horseradish
  • 1/4 tsp Worcestershire Sauce
  • 1/4 tsp Lemon Juice
  • 1/8 tsp Hot Sauce
Directions:
  1. Mix all of the ingredients together and enjoy!
Nutrition: 8 servings
Per serving
  • Calories: 20.3
  • Fat: 0g
  • Carbs: 4.1g
  • Fiber: 0g
  • Protein: 0g
0

Many of us coffee fanatics loved Starbucks or all the other fancy coffees before transitioning to this way of life. If not every day it may have been more as a special treat.
I don't trust what I can't see and will no longer go to fancy coffee shops for any 'treat' coffee. Too many times has something been requested as 'sugar free' and it hasn't been made this way, or there were hidden sugars in their cool whip or other items.
I havent ever been one for a huge need for these fancy coffee's but occasionally it is a great way to sooth a sweet tooth! This Bullet Proof Coffee is packed with fat and flavor!
If you are wanting something with a little less fat, just reduce some of the butter and coconut oil! Get Creative and make it your own ☺.


Ingredients: 
  • 6 oz Coffee; HOT
  • .5 Tblsp Coconut Oil
  • 1 Tblsp Butter; Kerry Gold is the Best!
  • 1 tsp Cocoa Powder
  • 1.5 Tblsp Heavy whipping cream
  • 1/4 Tsp Cinnamon
  • dash salt
  • Sweetener; Your choice

Directions:
  1. Place all the ingredients in a blender.
  2. Blend until whipped together (You should get 1/2-1" of froth)
  3. Enjoy!
Notes: For Sweetener, I like using either Torani French Vanilla syrup or Salted Caramel. Just be sure you are getting the Sugar Free Varieties!

Makes 1 Serving
Nutrition: (Sweetener is not factored into the recipe as it will vary depending on taste.)
  • Calories: 204
  • Total Fat 21.4g
  • Total Carbohydrate 2.5g
    • Dietary Fiber 0.9g
    • Sugars, other 1.6g
    • Net Carbs 1.6
  • Protein 1.4g 2 %
0

My sister had made this recipe for Thanksgiving a few years back. I admit, as much as I should have avoided it, I am glad I tried the high-carb treat. It was fantastic! The original (high-carb) version of this used gingersnap cookies for the crust. That of course, is not an option when sticking with Keto, So I worked some magic using various recipes and came up with this crust substitute.  The crust is perfect for bars, pies etc. My husband tried some raw and felt it tasted a lot like cookie dough.
I would love to hear how this turned out for you! This recipe made (3) 8 1/2" pans of dessert. You can't go wrong!
Crust Ingredients: 
  • 5 cup Almond flour
  • 2/3 cup Erythritol (or any sweetener of choice*; omit for savory pie crust)
  • 1/4 tsp Stevia
  • 1/2 tsp Salt (or 1 tsp for savory pie crust)
  • 1/2 cup Butter (measured solid, then melted)
  • 2 large Eggs
  • 1 tsp Vanilla extract (omit if making a savory crust)
  • 1 tsp Ginger
  • 2 T Cocoa Powder
  • (3) 8.5" straight sided round cake pans
Crust Directions: 
  • Preheat the oven to 350 degrees F
  • Mix together the dry ingredients
  • In a separate dish, mix in the wet ingredients and then combine with the dry ingredients.
  • The dough should be dry and crumbly. Keep mixing until it is uniform and there are no crumbs remaining.
  • Split the dough into 3 equal amounts and press into the bottom an 8 1/2" round cake pan. Carefully poke holes in the surface using a fork to prevent bubbling.
    Bake for 7-10 minutes. Cool slightly before adding the filling (below)
Cheesecake Ingredients:
  • 24 oz Cream Cheese
  • 1 C. Sweetener (equal to sugar, divided in half)
  • 1 tsp Vanilla
  • 3 Eggs, (divided in half)
  • 1 C. Canned Pumpkin
  • 1 tsp ground Cinnamon
  • 1/4 tsp Nutmeg
Cheesecake Directions:
  1. Mix cream cheese, 1/2 C sweetener 1/2 of the eggs and 1/2 tsp vanilla together.
  2. In a seperate dish mix the rest of the sweetener, eggs, vanilla, cinnamon, nutmeg and pumpkin together.
  3. Pour cream cheese into the 3 prepared crusts equally.
  4. Spread out the cream cheese throughout the pan and place dollops of the pumpin on top
  5. Take a butter knife and swirl the pumpkin through the cream cheese mixture.
  6. Bake all 3 at 325 degrees f. for 45-55 minutes.
Makes: 24 servings (8 slices per tin)
Nutrition:
  • Calories: 267
  • Fat: 24.7g
  • Carbs: 6.3g
  • Fiber: 3g
  • Protein: 7.7g
0

This one has always been a family favorite. Often served with rice, which can easily be replaced with cauli-rice or

in this case, shredded cabbage.  It has an earthy taste the quickly becomes something you would crave for comfort food.
We usually made this in a crock pot, however, this time, we made it in the Instant Pot and it turned out GREAT with a fraction of the time.
Ingredients:
  • 1.5 lbs Pork or Chicken
  • 1/4 c. Chopped Onion
  • 16 oz. Diced Tomatoes
  • 1 tsp Chicken Soup Base
  • 1 tsp Marjoram
  • 1 tsp Crushed Thyme
  • 1 tsp Salt
  • Dash of Pepper
Directions:
  1. Chop pork/Chicken into bite size pieces
  2. Place all ingredients into Instant Pot or crock pot
  3. Set Instant Pot to Meat/Stew on High  for 30 Minutes
    1. Release steam at 30 minutes.
  4. For Crock pot – Set on Med/High for 4-6 hours.
  5. Serve with cauli-rice or anything else you’d like

Nutrition: – Makes 6 Servings
Per Serving:
  • Calories: 295
  • Fat: 17.2g
  • Carbs: 2g
  • Fiber: 0.4g
  • Protein: 30.9
0

This one I threw together. I was thinking how much I missed the cheddar broccoli wild rice.
Normally I’m not a fan of cauliflower as a substitute for anything other than cauliflower. I figured this one wouldn’t be so bad since cauliflower and broccoli and cheese go really well together.

I whipped this up and it turned out fairly decent. I know the hubby sure enjoyed it!
Let me know what you think!
Ingredients:
  • 1 Medium Head of Cauliflower, Grated
  • 2 Cups chopped Broccoli crowns
  • 3 Cups Chicken Breast, cut to your likeing
  • ½ Cup Heavy Whipping Cream
  • 1 T Butter
  • 1 tsp Onion Powder
  • 2 tsp Salt
  • 1 ¼ Cups Shredded Sharp Cheddar
  • 1 tsp Black Pepper
  • 3 tsp Minced Garlic
  • 2 tsp Olive Oil
Directions:
  1. Chop the chicken breast into desired bite size or smaller sizes
  2. Place olive oil in pan, add garlic and fry chicken until browned.
  3. Steam broccoli until ALMOST tender. (You can opt different ways to cook your broccoli)
  4. Take Cauliflower and grate it.
  5. In a large skillet place butter and melt it
  6. Once the butter is melted add cauliflower and cook on medium heat, stirring occasionally
  7. After about 5 min, add Heavy Whipping Cream, Onion Powder, Salt, Cheese, and pepper. Stir well
  8. Place lid on pan and stir every couple of minutes until cauliflower is desired texture.
  9. Mix Broccoli and chicken in with the cauliflower and serve.
Nutrition: Servings 8
Per Serving:
  • Calories: 296
  • Fat: 12.3 g
  • Carbs: 6.2 g
  • Fiber: 2.2 g
  • Protein: 34.5g
0

It is easy to make a basic ginger sauce for Chinese food, but sometimes you need to change it up a
bit. I loved Sesame Beef when I wasn't Keto. I haven't mastered making a crunchy thin beef flanks yet to go with the sauce, but this turned out well enough that it worked for the medley we put together.  The recipe is for the sauce only.
The picture definitely does not do any justice for the flavor of the sauce. I would love to hear your thoughts.
Ingredients:
  • 4 tbsp Soy Sauce
  • 2 tbsp Toasted Sesame Oil
  • 2 tbsp  Sukrin Brown Sugar
  • 2 tbsp Vinegar
  • 1 tsp Fresh Ginger
  • 3 tsp Minced Garlic
  • 2 tbsp Sesame Seeds (We skipped these)
  • ½ + tsp Xanthan Gum
  • ½ + Water (Add water to taste to tone down strength)
Throw all of this in one of those bullet blenders and blend away!
We drizzled this over a mix of Shrimp, broccoli, celery, mushrooms and some cabbage. Use a little at a time as the sauce itself can go a long ways You only need enough to coat the food and cook it down a little bit.  IT was FANTASTIC!
Nutrition Facts: Servings: 8
Per Serving:
  • Calories: 52.1
  • Fat: 3.5
  • Carbs: 3.9
  • Fiber: 0.14
  • Protein: 0.51
0

A while back we got Mr. Junkie a Dual function grill. One side is propane the other is charcoal.  Mr. Junkie had a rotisserie for a while but he didn’t have a grill that it fit on. Once we got this grill for him he quickly set up the rotisserie and has been making all kinds of great things on it.
Today was no exception! This beautiful pork loin turned out fantastic! Such a simple recipe and the smells that came from the grill for the 4 hours it was cooking was phenomenal.  I hope you enjoy this as much as our company and we did!
Ingredients
  • 3.5 lbs Pork Loin
  • 2 Tbs Paprika
  • 1/3 Cup Garlic Minced
  • 2 Tbs Soy Sauce
Brine
  • 1/3 Cup salt
  • Water
Water Bath
  • 1 Tbs Apple Cider Vinegar
  • Water
Directions:
  • Place 1/3 cup of salt into a large bowl
  • Add Water (enough to cover the pork loin)
  • Place the pork loin into the water and let it brine overnight
  • Once your Pork Loin has brined, cross cut it about 1/4-1/2 inch deep
  • Rub the minced garlic into the cuts
  • Sprinkle and rub the soy sauce over the Pork Loin
  • Rub the Paprika into the Pork Loin
  • Place on a rottisserie on low heat for 3-5 hours
    • Indirect Heat with a water bath placed underneath.
    • Add 1 Tablespoon of Apple Cider Vinegar to the Water Bath.
Note: If You do not have a grill, use your oven at about 300 degrees F.
Servings: 8
Amount Per Serving
  • Calories 439.48
  • Total Fat 29.91g
  • Sodium 417.2mg
  • Total Carbohydrates 1.94g
    • Fiber 0.62g
    • Sugar 0.23g
    • Sugar Alcohols g
    • Net Carbohydrates 1.32g
  • Protein 38.16g
0

After moving to AZ we found this little hole in the wall Mexican restaurant. Had the coolest entrance door and didn't seem like much at all. Took me a while to locate the restaurant again since we found it when we JUST moved to Arizona and did not have our barrings at all. Susies Mexican Cafe. I highly recommend it. This is where I had Albondigas the first time. This is where my new favorite soup was introduced to me and it was love at first 'slurp'!

I have been looking over several different recipes to find a great way to make this. I have had Albondigas at several different restaurants and the problem I noticed with being low carb is that there is always rice in the meatballs. I searched for a few different ideas that could be used to help hold the meatballs together and found that psyllium husk was a option.  It seemed to work perfectly!

I hope you enjoy the recipe as much as I did!
Normally there is Carrots but I left them out to keep the carb counts down.


Meatballs

  • 1 lb ground beef
  • 1 lb ground pork
  • 2.5 tsp Salt
  • 1.5 Tsp Pepper
  • 1.5 tsp garlic powder ( or 2 cloves garlic)
  • 1.5 tsp Onion Powder
  • 3/4 tsp Chili powder ( I used Ancho)
  • 3/4 tsp Cumin
  • 3/4 tsp Oregano (crushed)
  • 4 - 4.5 T Psyllium Husk (Binder)
  • 1 Egg, beaten


Vegetables

  • 3 Medium Zucchini - Chunked into bite size pieces
  • 3 Medium Summer Squash- Chunked into bite size pieces
  • 1/2 LargeOnion- Chunked into bite size pieces
  • Entire Celery bundle, diced
  • 1 medium tomato, diced  (Keep separate from other vegetables regardless of the picture to the right 😉 )
  • 2 roasted poblanos ,pealed and chopped ( i didn't have these when I made mine)

Soup:
  • 20 Cups of Water
  • 3 T soup base ( Chicken or Beef, or you can do 1/2 and 1/2)
  • 2 tsp Cumin
  • 1 tsp Onion Powder
  • 2 tsp Salt
  • 1.5 tsp Chili Powder
  • Add additional seasonings of the above to create the flavor as desired
Directions:
Meatballs 
  1. Mix all ingredients and form into 1-1.5" meatballs
  2. Brown in a pan on all sides. Do not cook through.
  3. Set aside
Soup
  1. Add all vegetables except the tomatoes once the broth begins to boil
  2. Cover and reduce heat to simmer for 30 min
  3. After 30 min add diced tomatoes
  4. Simmer for another 5 min 
  5. Taste test and add seasonings as desired
  6. ENJOY!!!


This makes about 12-14 Servings


0

MMMmmmmm Corn Dogs! This was one of my 'once in a while' treats before switching to a Keto life style. I loved the crunchiness of Corn Dogs but hated that they had added sweetness. All the advertising for 'Honey Batter'! It would frustrate me to no end! Not everyone likes sweet!

Since switching to the Keto lifestyle we have found some amazing recipes. This is one of them.
I found it on a Reddit Page and have to give SuperSpaldo707 all of the credit! These are fantastic! I am sure I will be posting more of their recipes as I try them.

Ingredients:

  • 1 C Powdered Parmesan (Parmesan from the shaker cans)
  • 1 Large Egg
  • 1 T Coconut Flour (This helps with texture)
  • 2 T Water
  • 5 Hot Dogs


Directions: 

  1. Mix all together and season to your liking
  2. Take a Hot Dog and press the dough around it. 
  3. Once the hot dog is fully wrapped you can fry this in your choice of oil ( I used Coconut oil)
  4. Fry until golden and drain on a paper towel.
  5. ENJOY!


Notes:

  • I added some onion powder, salt and ancho chili powder to add some extra flavor. I didn't want the corn dogs to taste completely of Parmesan.
  • I also cut the hot dogs in half and made mini hot dogs
  • When I made this recipe I was able to cover 4 full length hot dogs. With some practice I'm sure I could get all 5. 
  • When Frying in a pan, roll the corn dog for the first 5 seconds in the oil so it doesn't stick to the bottom of the pan. 


0

We have been craving Chinese food since starting our path on keto. So we thew something together. Turned out really good.

Based on the nutrition facts I think we could have added a little more green and red pepper. If you are concerned about the bean sprouts I have found that the La Choy canned bean sprouts have lower carbs than fresh. As much as I would prefer the fresh, I really enjoy bean sprouts. I think my next Asian dish is going to be Egg Foo Young :)  Its a bit of a mess to make, but it turns out far better than I have ever had at a Chinese buffet.
The amount of Chicken listed is an estimate. We had a prepackaged portion and just used the whole thing up. We have about 5-6 servings out of the recipe.

We riced up some cauliflower and put it on top but in my opinion its fine without it.

Ingredients:

  • 1 Med Green Pepper
  • 1 Medium Red Pepper
  • 1 Can of La Choy Bean Sprouts
  • 100 grams Chopped Mushrooms
  • 1.5 lbs Chicken Leg Meat, thinly sliced
  • 1 T Sesame Oil
  • 1 T Olive Oil
  • 2 T Minced Garlic
  • 1 C Chicken Broth
  • 2 T Flavor Enhancer
  • Salt to Flavor
  • 1/2 Tsp Chinese 5 Spice
  • 1 Tsp Grated Peeled Fresh Ginger
  • 3/4 tsp Xanthan Gum
Directions:


  • Heat a large skillet and place Olive and Sesame oil in it. 
  • Place chicken in skillet and cook to 1/2 done. Add minced garlic and cook until done. 
  • Add remaining ingredients except for the Xanthan Gum. 
  • Cook until Vegetables are desired doneness. 
  • Taste test the flavor and add salt or other seasonings as you wish. 
  • Once you have the flavor to your liking, add Xanthan Gum and cook for another 2-3 min. 


Nutrition Facts:
Servings: 5
Nutrition Per Serving:

  • Calories: 352
  • Fat: 16.1g
  • Carbs: 7.7g
    • Fiber: 1.7g
    • Sugars: 2.9g
    • Net Carbs: 6g
  • Protein: 43.1g


0

I have never cooked lamb before and I absolutely love gyro's. I know that the carbs in Gyro's can

very since some people add flours to the mix when they make the loaf. My husband and I decided to give it a go and make our own. We are very happy that we did.

We seen so many different recipes we decided to go with an easier one. But if anyone has any other tips tricks or otherwise, we are always all ears. As I'm sure you can all tell, we like to try new things.

The recipe we followed is below though we doubled it since we had 2 lbs of lamb. To help reduce carbs we only used 1 medium onion instead of doubling it. Everything else we doubled.

Recipe for the Gyro Meat was found on Reddit - here
Recipe for the Tzatziki was found from Ruled Me - here.

Lamb Meat - Gyro Meat

Ingredients:
  • 1 medium onion, finely chopped or shredded and drained (See directions)
  • 1 pound ground lamb
  • 1 tablespoon finely minced garlic
  • 1 tablespoon dried marjoram
  • 1 tablespoon dried ground rosemary
  • 2 teaspoons kosher salt
  • ½ teaspoon freshly ground black pepper

Directions:
  1. Preheat the oven to 325 degrees F.
  2. Process the onion in a food processor for 10 to 15 seconds and turn out into the center of a tea towel. Gather up the ends of the towel and squeeze until almost all of the juice is removed. Discard juice.
  3. Return the onion to the food processor and add the lamb, garlic, marjoram, rosemary, salt, and pepper and process until it is a fine paste, approximately 1 minute. Stop the processor as needed to scrape down sides of bowl.
  4. Place the mixture into a loaf pan, making sure to press into the sides of the pan. Place the loaf pan into a water bath and bake for 60 to 75 minutes or until the mixture reaches 165 to 170 degrees F. Remove from the oven and drain off any fat. Place the loaf pan on a cooling rack and place a brick wrapped in aluminum foil directly on the surface of the meat and allow to sit for 15 to 20 minutes, until the internal temperature reaches 175 degrees F.
  5. Slice and serve.

Note: Using a carving knife to cut the meat works great. Just like the shaved meat from a Greek restaurant!  
I would also recommend grilling the meet after its been shaved. it will improve the taste a bit and of course look tastier!

Entire loaf:
Fat - 93.25g
Total carbs - 12.34g
Net carbs - 10.64g
Protein - 78.05g

Tzatziki Sauce
Ingredients:
  • 1 cup full-fat plain Greek yogurt
  • 1 teaspoon garlic powder
  • 1 tablespoon white vinegar
  • 2 tablespoons olive oil
  • 2.5 ounces (¼ whole) cucumber, seeded and grated
  • 2 tablespoons minced fresh dill (or 2 tsp dry)
  • salt and pepper to taste
Directions: 
  1. Squeeze liquids out of the cucumbers. Discard the liquid and place grated cucumber into bowl.
  2. Add remaining ingredients and stir well. 
  3. Refrigerate for at least 45 min. The taste will improve as it sits.

Tzatziki Sauce (Servings - 8 ) Full Recipe Per Serving
Calories 536 67.00
Fats(g) 41.39 5.17
Carbs(g) 15.19 1.90
Fiber(g) 0.8 0.10
Net Carbs(g) 14.39 1.80
Protein(g) 26.61 3.33
Note: Carb content can be greatly reduced by finding the lowest carb yogurt. Please be careful of any additives in the yogurt. The example used above had  11.34 g Carbs for 1 cup.
0

We found an AMAZING Flat Bread recipe. I have tried all kinds of different ones so far for tortilla's but they all had a very strong flavor to them that detracted from whatever you might want it for. Unless you made them specifically for that meal, which meant you could not make a bunch in advance.

My husband and I were watching a video on YouTube and were pleasantly surprised with the simple ingredients and the detailed video. A GIANT shout out to Headbangers Kitchen for all the videos and the recipes he posts. He does a fantastic job!


These could be used for so many different things. I am unbelievably happy with them. They hold together very well and do have a some elasticity to them that helps with this. (Meaning they don't crumble and fall apart and they aren't bouncy balls either)


Recipe makes 4 servings/naans/parathas/uttapams
View  Headbangers Kitchen video to see the recipe in action!

Ingredients:

  • 1/2 Cup (50 grams) Coconut Flour
  • 2 Tbsp (8 grams) Psyillium Husk
  • 1/2 Tsp Baking Powder
  • 1 Cup Water
  • Oil/Ghee/Butter for frying


Directions:

  1. Heat the water for 30 seconds in the microwave
  2. Mix all the dry ingredients and add the water 
  3. Form a dough and cut into 4 parts
  4. Roll out the dough
  5. Fry on both sides till golden brown
  6. Serve


Macros per serving (4 servings per recipe)
Calories: 111
Fat 4g
Total Carbs: 19g
Fiber: 15g
Net Carbs: 4g
Protein: 4g


0


I have read several different options for making apple pie and I have been eagerly looking forward to trying the different options. I have listed both options below as they are both very tasty and make a great dessert. I do feel, however, that the Chayote makes a closer 'Apple Pie' texture than the Jicama does.

The flavor of both are phenomenal though!

I did only make the filling and did not make a full apple pie with crust etc. So I have listed the fillings below. Once I try a crust I will list this as well.

As with most of my recipes, I want to give the original poster credit.
I obtained both recipe from Low Carb Yum. If you want to peruse her comments regarding the recipe you can access the Chayote Recipe  and the Jicama Recipe by clicking on the links.


Chayote Recipe

This recipe would be PERFECT for apple pie or any other recipe that calls for baked apples. Perhaps even baked apple cake, or baked apple bread! The texture is very similar to that of baked apples and the flavor is fantastic!

Ingredients
  • 5 medium chayote squash
  • 3/4 cup sweetener
  • 1 tablespoon xanthan gum
  • 1 tablespoon lemon juice
  • 2 teaspoons apple extract
  • 1/3 cup butter cut in small pieces
  • 1 tsp Apple Pie Spice
    • Alternate options to this would be to use a blend of 
      • Cinnamon
      • Cloves
      • Nutmeg
Directions:

  1. Peel chayote and cut into slices.
  2. Boil sliced chayote until fork tender. Drain. Return to pot.
  3. Add sweetener, xanthan gum, lemon juice, and apple extract to cooked chayote squash and Apple Pie Spice.
  4. Add Butter and mix together once melted


Jicama Recipe

The Jicama recipe I had cooked a lot longer in hopes to cook out some of the 'crunch' from the jicama. There jicama carmelized and the crunch never did dissipate. It was more like eating a fresh unbaked apple with a baked apple taste. Still very good, but not sure I would want this option for a pie. It was fantastic with cool whip!

Ingredients
  • 4 cups jicama chopped
  • 1/2 cup Swerve
  • 1/2 cup butter
  • 1 tablespoon cinnamon
  • 1/4 teaspoon nutmeg
  • 1/8 teaspoon cloves
  • 2 teaspoon apple extract
  • 1 teaspoon vanilla extract

Directions:
  1. Combine chopped jicama with butter, sweetener, and spices in a pan.
  2. Cook and stir over medium heat until jicama has softened.
  3. At end of cooking, stir in apple and vanilla extracts.
  4. Serve warm.
  5. Can be refrigerated for up to a week or frozen for several months.
0


 I needed to find something other than eggs for breakfast. Something that I could grab, on the go that actually tasted good. Something that I could change up with different flavors if I wanted to.

I found this recipe!  I stumbled across this from SlenderKitchen. I follow several blogs on facebook and often I see so many I have to try. I am very very glad I tried this one. I have made these about 4-5 times now and this time I made a double recipe.

I would love to hear about your experiences with this recipe along with what you decided to add to change it up!

I tweaked her recipe slightly to just add in some berries.

Image represents a double batch

Ingredients:
  • 6 eggs
  • 4 tbsp. melted butter 
  • 4 tbsp. melted coconut oil 
  • 1/4 cup almond milk ( I used unsweetened coconut milk)
  • 1.5 tbsp. vanilla extract 
  • 1/2 cup sugar substitute, granulated 
  • 2/3 cup coconut flour 
  • 1 tsp. baking powder 
  • 1/2 tsp. salt 
Addition Options
  • 1 cup of berries- your choice
    • If berries are frozen and rather juicy may need to add a couple TBL spoons more of coconut flour - start with one T at a time.

 Directions:
  1. Preheat the oven to 375. 
  2. Whisk together the eggs, butter, coconut oil, almond milk, vanilla extract, and sugar substitute. 
  3. In another bowl, whisk together the coconut flour, baking powder, and salt. 
  4. Slowly add the coconut flour to the wet ingredients and stir to incorporate. 
  5. The batter will be thick. fold in any additions (Berries etc)
  6. Pour into prepared standard muffin tin. 
  7. Bake for 20-25 minutes until cooked through.
    • Depending on your Muffin Size you may have to cook this longer.


The Nutrition Values below include 1 cup of Blueberries and the use of coconut milk in place of the almond milk. 


0

Found this recipe from one of my favorite bloggers (All Day I Dream About Food). She comes up with some fantastic things!

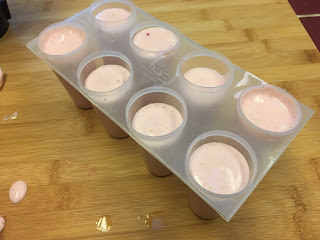
My husband was actually pushing me to make these for a few days so I finally made them! I have to say they are absolutely delicious! Shared them out with some friends and they were huge fans as well. The best thing - they are super easy to make and the recipe makes quite a bit! With the mold that I have I could have made about 8-10 more with how small the Popsicle are.

Hope you all enjoy this one:) Especially now that warm weather is approaching!  They have a lemon strawberry flavor that is very refreshing!

These went too fast and I did not get a finished picture but I know I will be making them again! :)

Ingredients:

  • 8 oz cream cheese, softened
  • 1 cup cream
  • 1/3 cup powdered Swerve Sweetener or other powdered erythritol - I used a little swerve and a little truvia. Niether were powdered. I just ran them in the blender for a little bit
  • 1/4 tsp stevia extract
  • 1 tbsp lemon juice
  • 2 tsp lemon zest
  • 2 cups fresh strawberries, chopped, divided

Directions:
  1. Place cream cheese in a food processor and process until smooth. ( I used a blender- The processor would probably worked a bit better, but if you don't have one, the blender will still work)
  2. Add cream, powdered erythritol, lemon juice, lemon zest and stevia extract. Process until well combined.
  3. Add 1 1/2 cups of the strawberries and process until almost fully smooth. Stir in remaining chopped strawberries.
  4. Pour mixture into popsicle molds and push popsicle sticks about 2/3 of the way into each (I recommend getting wooden sticks, as they tend to grip the mixture better and don't come out when you are trying to unmold the popsicles).
  5. Freeze at least 4 hours. To unmold, run under hot tap water for 20 to 30 seconds, and then twist stick gently to release.

NUTRITION - Taken from the blog listed above

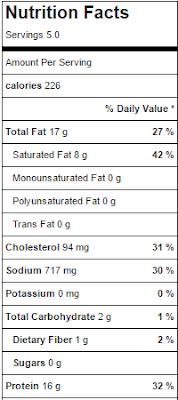
Serves 12. Each serving has 3 g of carbs and 1 g of fiber. Total NET CARBS = 2 g.

122 Calories; 12g Fat (83.6% calories from fat); 2g Protein; 3g Carbohydrate; 1g Dietary Fiber; 38mg Cholesterol; 63mg Sodium


0

I have been craving chocolate for the last few days. ( Or always lol) and came across a post for Chocolate cake from Low Carb Yum. The comments on the post were incredible so I had to try it for myself.

Don't let the ingredients deter you. You cannot tell that there is Zucchini in this at all and it is incredibly moist! Its just like box cake but BETTER! 😁

I also found a recipe for the Coconut frosting that goes perfecting with German Chocolate Cake. And it is great! I can't say enough good things about these recipes.

I unfortunately did not take as many pictures as I normally do so hopefully I will remember to take pictures next time I makes this. I can guarantee that this will be made again!

Ingredients

  • 1 cup coconut flour
  • 1 cup unsweetened cocoa powder
  • 3/4 cup artificial sweetener
  • 1/4 Truvia
  • 1 teaspoon cinnamon
  • 2 teaspoons baking soda
  • 2 teaspoons baking powder
  • 1/2 teaspoon sea salt
  • 1/2 cup coconut oil melted
  • 8 large eggs beaten
  • 2 teaspoons vanilla extract
  • 4 cups zucchini shredded

Directions:

  1. In large mixing bowl, combine coconut flour, cocoa, sweetener, cinnamon, baking soda, baking powder, and sea salt.
  2. Mix in eggs, coconut oil, and vanilla until well combined.
  3. Stir in zucchini 
  4. Spread out into greased 9x13-inch pan (or two round 9-inch pans).
  5. Bake at 350°F for about 40 minutes or until toothpick inserted in center comes out clean.
  6. Cool on wire rack. Once cool, frost with desired frosting.

There are many different  frosting options available however I only made the coconut frosting as it is one of my favorites on this kind of cake. 

Pecan Coconut Frosting - From Low Carb Yum
(I have doubled from the original recipe provided by Low Carb Yum to cover the 9x13 cake) 

Ingredients  
  • 1 cup unsweetened almond milk
  • 1 cup sweetener I used Swerve Confectioners Powder
  • 2 egg yolk
  • 1/2 cup butter
  • 1/2 teaspoon xanthan gum optional
  • 1 teaspoon vanilla extract
  • 1.5 cup unsweetened shredded coconut
  • 1 cup chopped pecans
Directions: 
  1. Combine almond milk, sweetener, egg yolk and butter in a saucepan.
  2. Heat over medium heat. When bubbles form, sprinkle in xanthan gum.
  3. Continue heating until thickened.
  4. Remove from heat and stir in vanilla, coconut and pecans.
  5. Spread mixture over cooled cake.


The Cake recipe yields 24 servings and the frosting is plenty enough for the entire cake.

Frosting Nutritional Facts

Cake Nutritional Facts


0

I had so many doubts when it came to this recipe. With a Cheese base, I expected it to be soggy, wilted and greasy. I am happy to say I was WRONG!

This is easily THE best pizza crust I have ever had that is low carb. It tastes just like regular pizza crust. It has structure, rigidity, crunch, flavor, and is extremely close if not exactly like store bought frozen pizza. (Depends on the kind you typically buy, of course 😉.

Note: It looks burnt - but it was perfect! Don't like the color, lessen the bake time :)

Recipe obtained from DitchtheCarbs.com Ingredients

  • 170g / 6oz / 1 3/4cups pre shredded/grated cheese mozzarella is the best or Edam/mild cheese
  • 85g / 3oz / 3/4cup almond meal/flour
  • 2 tbsp cream cheese
  • 1 egg
  • pinch salt to taste
  • Seasonings to taste ( I used Basil, Oregano, Onion Powder)


Directions
  1. Mix the shredded/grated cheese and almond flour/meal in a microwaveable bowl. Add the cream cheese. Microwave on HIGH for 1 minute.
  2. Stir then microwave on HIGH for another 30 seconds.
  3. Add the egg, salt, rosemary and any other flavourings, mix gently.
  4. Place in between 2 pieces of baking parchment/paper and roll into a circular pizza shape (see photos above). Remove the top baking paper/parchment. If the mixture hardens and becomes difficult to work with, pop it back in the microwave for 10-20 seconds to soften again but not too long or you will cook the egg.
  5. Make fork holes all over the pizza base to ensure it cooks evenly.
  6. Slide the baking paper/parchment with the pizza base, on a baking tray (cookie tray) or pizza stone, and bake at 220C/425F for 12-15 minutes, or until brown.  ( I have a gas stove and did 10 min. So I would probably keep an eye on it at 7-8 min and go from there)
  7. To make the base really crispy and sturdy, flip the pizza over (onto baking paper/parchment) once the top has browned.
  8. Once cooked, remove from the oven and add all the toppings you like. Make sure any meat is already cooked as this time it goes back into the oven just to heat up the toppings and melt the cheese. Bake again at 220C/425F for 5 minutes


Recipe Notes

Fat Head pastry can also be made by replacing the almond meal/flour with 1/4 cup (4 tbsp) coconut flour.
Nutrition panel is for base only as toppings will vary widely depending on what was added and how much.
Nutrition Facts below taken from SparksPeople Analyzer and reflects the nutrition facts for the entire crust. This does not include sauce or toppings.


0