Menu


This was a quick little creation that sounded really good. I used to love jello powder in cottage cheese mixed with fruit, but that has far too many carbs than I care to even think about.
These little things are great in a pinch and a fat bomb to boot! I've made them a couple times now and they are almost addicting!
Whats great is you can make these in any flavor you choose! Don't want to use pre-packaged jello? use gelatin or Xanthan gum and different flavors! The sky is the limit! Let your imagination run wild!
We would love to hear what you tried with yours!

Coconut Rolled Jello Fat Bombs

Servings20 Fat Bombs
Ingredients
  • oz Cream Cheese Softened
  • 8.5 g Sugar Free Jello- Any Flavor
  • cup Unsweetened Coconut Flakes
  • 1 packet Stevia
Directions:
  1. Soften the Cream Cheese
  2. Add the SF Jello and Stevia packet and mix well
  3. Chill in the refrigerator for approximate 10-15 min. This will allow the mixture to be more easily formed into balls.
  4. Roll mixture into 1" balls and then roll through coconut flakes to coat.
  5. Store in the fridge and enjoy!
Alternate options: Roll in ground almonds or almond flour. This option is one of my favorites.
Makes: 20 Fat Bombs
Nutrition Facts per Jello Ball:  (Coconut Jello Fat Bombs)
  • Calories: 50
  • Fat 4.5g
  • Carbohydrate 0.7g
    • Dietary Fiber 0.2g
    • Sugars, other 0.6g
      • Net Carbs: 0.5g
  • Protein 0.9g

Almond Coated Jello Bombs


Ingredients
  • oz Cream Cheese Softened
  • 8.5 g Sugar Free Jello- Any Flavor
  • 1/2 cup Unsweetened Coconut Flakes
  • 1 packet Stevia
  • 1/2 cup Almond Flour (Not likely to use all of it)
Directions:
  1. Soften the Cream Cheese
  2. Add the SF Jello and Stevia packet and mix well
  3. Chill in the refrigerator for approximate 10-15 min. This will allow the mixture to be more easily formed into balls.
  4. Mix in coconut flakes,
  5. Roll mixture into 1" balls and then roll through coconut flakes to coat.
  6. Store in the fridge and enjoy!

Serving Size: 1 Serving (21g)
Recipe Makes: 20 Servings
Nutrition Per Serving: (Almond Coated Jello Bombs)
  • Calories: 56
  • Total Fat 4.9g
  • Total Carbohydrate 1g 
    • Dietary Fiber 0.5g
    • Sugars, other 0.5g
      • Net Carbs: 0.5 g
  • Protein 1.5g
0

Great Pizza Snacks to help curb those pizza cravings or just finger food or H'orderves for a get together.  These ended up being fairly easy to make and were quite tasty.
These even lend themselves to being more creative by adding in some peppers, black olives, onions, maybe even some spinach and other items! The sky is the limit! What would you like on your pizza bites?
For these ones I put a few pieces of mushrooms and yellow pepper.

Servings: 12 Snack bites
Ingredients:
  • 60 g shredded cheese
  • 1 Egg
  • 66 Slices Pepperoni
  • 1/2 tsp Oregano
  • 1/2 tsp Basil
  • 2 Tbs Pizza Sauce
Directions:
  1. Warm the pepperoni up slightly as it makes it easier to fit into the smaller muffin tins.
  2. Place 3 pepperoni slices in each section of the muffin tray.
  3. Mix the cheese, egg, basil and oregano.
  4. Divide the cheese mixture equally in the muffin cups
  5. If you are adding in vegetables, add these on top.
  6. Bake for 5-7 minutes at 450 degrees F.
  7. Let sit for 3-5 minutes before pulling the pepperoni cups from the tin.
  8. Place a dollop of pizza sauce on each cup and enjoy!

Nutrition Facts
Serving size: 1/12 of a recipe (0.8 ounces).
Amount Per Serving
  • Calories 76.51
  • Total Fat 6.78g
  • Sodium 242.48mg
  • Total Carbohydrates 0.89g
    • Fiber 0.05g
    • Sugar 0.02g
    • Sugar Alcohols 0g
    • Net Carbohydrates 0.84g
  • Protein 1.72g
0

These turned out fantastic and were demolished rather quickly. A Great low carb snack or even great as a lunch!  I hope you enjoy these as much as we did!
Servings
Servings: 12
Yield: 12 Pinwheels
Cooking Times
Preparation Time: 10 minutes
Inactive Time: 30 minutes
Total Time: 40 minutes
Ingredient
  • 2 slices Turkey Lunchmeat
  • 5 Tbs Cream Cheese
  • 4 Strips of bacon
  • 1 small Avocado
  • 1 tsp Ranch Seasoning Mix (Home Made or Store Bought)
  • 1/2 can of Black Olives
Directions:
  1. Cook and crumble bacon (optional to leave in strips)
  2. Slice Black Olives
  3. Dice Avocado
  4. Mix cream cheese with ranch mix.
  5. Spread Cream Cheese Mixture on to the turkey
  6. Layer in the avocado, bacon and black olives.
  7. Roll up using cling wrap and refridgerate for 30 min
  8. Cut and serve.

Nutrition Facts
  • Serving size: 1/12 of a recipe (1.7 ounces).
Amount Per Serving
  • Calories 187.57
  • Total Fat 19.5g
  • Total Carbohydrates 2.08g
  • Fiber 1.37g
  • Sugar 0.3g
  • Sugar Alcohols 0g
  • Net Carbohydrates 0.71g
  • Protein 1.36g
0


 I honestly don't know how I survived before acquiring a stand mixer! There are several other brands out there, but nothing compares to a KitchenAid. There are a wide range of attachments that you can add to your mixer which makes it a platform you can build to meet your needs. I personally don't enjoy clutter on my kitchen counters so most everything has a home in a cabinet somewhere, but my KitchenAid has its own esteemed place on display.


We purchased our Artisan series 5 Quart Tilt-head mixer in Imperial Grey used but in great shape. I don't the the previous owners ever really used it. The finish on it is textured and feels very durable. We decided on this finish due to its easy cleanup and the matte finish does not show fingerprints. It comes with a 5 Quart mixing bowl with handle and three mixing attachments. The included attachments will handle most of the mixing jobs that you can throw at them. There is a  for whipping and mixing, a dough hook for kneading, and a beater for....beating?

The mixer itself is very heavy and weighs in at nearly 25 lbs. The head tilts up so that you can lock in the mixing bowl or change attachments. Care should be used when moving the mixer. Make sure that if you grab it by the head to move it, that the head is locked in place. If not, the base will drop down you can spill things out of the bowl. One locked in, you turn the mixer on by moving the sliding switch on the left side towards the front of the mixer. This is a 10 speed mixer and the switch has little clicks along the way to help you know what speed you are in. The mixing attachment will spin and also orbit around the bowl.

The power of a KitchenAid mixer is hard to compare if you have only used a hand mixer before. Heavy or dry ingredients just don't slow it down. It just powers through mixing things, even heavy things like cookie doughs.

Kitchen-Aid Attachments

As I mentioned above, Kitchen-Aid mixers are designed so you can add attachment to increase the usefulness and versatility. Kitchen-Aid stand mixers are compatible with attachments made all the way back to the current versions design in 1937. This means there are 80 years worth of attachments out there just waiting to be discovered and put to work in your kitchen. I don't use a lot of attachments for my Kitchen-Aid yet, but there are two items that I do use a lot.

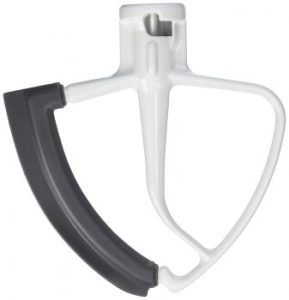
Kitchen-Aid Flex-Edge Beater


The first is a Flex-Edge Beater which helps scrape the sides of the bowl while mixing. This Beater has a rubber wiper on one side that helps incorporate things stuck to the side of the bowl back into the mix. And it keeps me from having to take a rubber spatula to the bowl while mixing. I can walk away and do other stuff. I believe Kitchen-Aid sells a flex-edge with two rubber wipers also, but I have not ordered one of those yet.

Kitchen-Aid Pasta Roller & Cutters


A pasta roller? On a Keto diet? We received a pasta set as a gift. We used them a few times to make fresh fehttuchini and soup noodles back before starting our Keto adventure. Since going Keto, we stashed our pasta kit in the back of the cupboard and forgot about it.

Our pasta kit has two main parts, a fehttuchini cutter and a dough roller. The dough roller has five thickness settings which gives you control over how thick your doughs are. Like I said, we had stashed our kit in the back of the cupboard thinking we wouldn't really ever use them again. But then Mrs. Recipe Junkie found some recipes for crackers and tortilla chips. We were struggling to roll out the crackers to a consistent thickness.

Pasta attachments are meant to be kept dry. As such you can wipe down with a slightly damp cloth after use, but you should never wash them. And if you are following the directions with them, you should never really need to.

Our Attachment Wish List

There are a huge variety of attachments that we want to add to our collection. There is an ice-cream maker that we want to get to make Keto friendly deserts. I would also enjoy a meat grinder to make sausages and jerkies without having to pull out my big grinding setup.

Another essential attachment for a Keto kitchen is a Spiralizer so you can make Zoodles!
If you don't already have a stand mixer of some type, a KitchenAid should be your top priority. It will change the way you cook!
0